
General Actions:


DevForce Resource Center » Punch » Reference apps and tutorials » The Happy Hour Tutorial » Data in a ListBox
Last modified on January 26, 2015 14:47
Contents
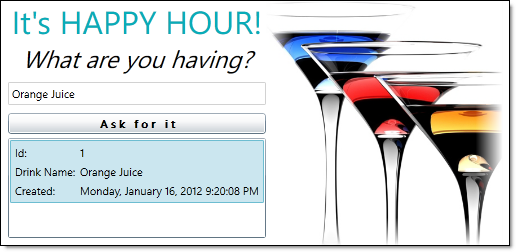
Right now the "Happy Hour" application pops up a message box promising to get us a drink. We’ll change that. We’re finally ready to put the (M)odel in MVVM by binding to an entity defined in its own model project.
The revised application will accept a drink name, create a new DrinkOrder entity with that name, add this new DrinkOrder to a DrinkOrders collection, and display that collection in a ListBox.
Here's the ListBox version in action:
Add a Model project
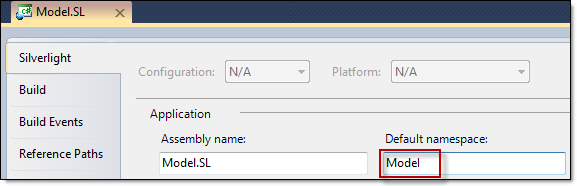
1. File |Add | New Project | Silverlight Class Library | "Model.SL"
3. Pick Silverlight 4 or Silverlight 5 depending upon which Silverlight version you are building.
4. Delete the template-generated Class1.
5. Change the project’s default namespace to Model in the Model.SL property sheet.
6. Add | Class | "DrinkOrder"
7. Replace the contents with the following definition of a DrinkOrder entity:
| C# | namespace Model { public class DrinkOrder { protected static int NextId = 1; public DrinkOrder() { Id = NextId++; DrinkName = "<new DrinkOrder>"; Created = System.DateTime.UtcNow; } public int Id { get; private set; } public string DrinkName { get; set; } public System.DateTime Created { get; private set; } } } |
That's all will do in the Model project for now. Return to the HappyHour Silverlight application project.
The ViewModel has DrinkOrders
1. Add a Model.SL project reference to the HappyHour project.
2. Open MainPageViewModel.
3. Add a DrinkOrders property of type BindableCollection<DrinkOrder>.
| C# | public BindableCollection<DrinkOrder> DrinkOrders {get; set;} |
4. Add a "using" statement to the model.
| C# | using Model; |
Soon we’ll add a ListBox to the view and we’ll name it "DrinkOrders", the same as the property name. A convention will kick in, binding the ListBox.ItemsSource to this DrinkOrders property automatically.
Of course the ViewModel itself betrays no awareness of this future; its job is to make the DrinkOrders available in a bindable form. Mission accomplished.
5. Add a constructor to initialize DrinkOrders.
| C# | public MainPageViewModel() { DrinkOrders = new BindableCollection<DrinkOrder>(); } |
6. Add a SelectedDrinkOrder property.
| C# | private DrinkOrder _selectedDrinkOrder; public DrinkOrder SelectedDrinkOrder { get { return _selectedDrinkOrder; } set { if (_selectedDrinkOrder == value) return; _selectedDrinkOrder = value; NotifyOfPropertyChange("SelectedDrinkOrder"); } } |
We want to bind this property to the ListBox.SelectedItem so that the ViewModel hears when the user selects a drink in the ListBox.
We will reset the SelectedDrinkOrder each time we add a new drink. We want the ListBox to hear about that and adjust its selected item accordingly so we have to raise the PropertyChanged event when the SelectedDrinkOrder value changes.
We could write the binding by hand … but we don’t have to. The property name, SelectedDrinkOrder, adheres to a convention for Selector controls. If the Selector control's name is "Foos", the convention says that "SelectedFoo" (or "ActiveFoo" or "CurrentFoo") should be bound to the Selector control’s SelectedItem. SelectedDrinkOrder fits the pattern for a ListBox named "DrinkOrders".
7. Replace every "AskForIt" with "AddDrinkOrder" in the entire project. Use Visual Studio's global search-and-replace.
We are re-purposing the Button to add new DrinkOrder objects to the DrinkOrders collection.
8. Replace the body of AddDrinkOrder (formerly AskForIt) .
| C# | public void AddDrinkOrder() { var drink = new DrinkOrder {DrinkName = DrinkName}; DrinkOrders.Add(drink); SelectedDrinkOrder = drink; } |
We don't need AskForIt anymore but we do need an AddDrinkOrder method. Instead of launching a MessageBox, we create a new DrinkOrder with the user-entered drink name and add that DrinkOrder to the DrinkOrders collection. We’re also making the new drink order the "selected drink order" … a fact that should become apparent on screen.
The entire MainPageViewModel should look like this:
| C# | using System; using Caliburn.Micro; using Model; namespace HappyHour { [Export] public class MainPageViewModel : Screen { public MainPageViewModel() { DrinkOrders = new BindableCollection<DrinkOrder>(); } public BindableCollection<DrinkOrder> DrinkOrders { get; set; } private string _drinkName; public string DrinkName { get { return _drinkName; } set { _drinkName = value; NotifyOfPropertyChange("CanAddDrinkOrder"); } } private DrinkOrder _selectedDrinkOrder; public DrinkOrder SelectedDrinkOrder { get { return _selectedDrinkOrder; } set { _selectedDrinkOrder = value; NotifyOfPropertyChange("SelectedDrinkOrder"); } } public bool CanAddDrinkOrder { get { return !String.IsNullOrWhiteSpace(DrinkName); } } public void AddDrinkOrder() { var drink = new DrinkOrder {DrinkName = DrinkName}; DrinkOrders.Add(drink); SelectedDrinkOrder = drink; } } } |
Present DrinkOrders in a ListBox
1. Open MainPage.xaml.
2. Convert the StackPanel to a five row Grid.
| XAML | <Grid> <Grid.RowDefinitions> <RowDefinition Height="Auto" /> <!-- Title --> <RowDefinition Height="Auto" /> <!-- Question --> <RowDefinition Height="Auto" /> <!-- TextBox --> <RowDefinition Height="Auto" /> <!-- Button --> <RowDefinition Height="*" /> <!-- ListBox --> </Grid.RowDefinitions> <TextBlock ... Grid.Row="0" /> <TextBlock ... Grid.Row="1" /> <TextBox x:Name="DrinkName" ... Grid.Row="2" /> <Button x:Name="AddDrinkOrder" ... Grid.Row="3" /> </Grid> |
We can’t use the StackPanel anymore. We’re about to add a ListBox whose contents will grow potentially beyond the length of the browser window. We’ll want to scroll the ListBox when it does. Unfortunately, UI elements within a StackPanel can’t scroll. That’s by design … however inconvenient it may be for us. The contents of a Grid can scroll so we abandon the StackPanel in favor of the Grid.
3. Add a ListBox named “DrinkOrders” below the button; put it on the fifth row (row “4” counting from 0).
| XAML | <ListBox x:Name="DrinkOrders" Grid.Row="4" /> |
By convention, the ListBox.ItemsSource will be bound to (and populated by) the ViewModel’s DrinkOrders property. When the user selects a row in the ListBox, the associated DrinkOrder entity becomes the SelectedDrinkOrder.
4. Bind the ItemTemplate of the ListBox to "DrinkOrderDataTemplate":
| XAML | <ListBox x:Name="DrinkOrders" Grid.Row="4" ItemTemplate="{StaticResource DrinkOrderDataTemplate}" /> |
The ListBox needs a DrinkOrderDataTemplate; time to write it.
Write the DrinkOrderDataTemplate
We need a way to display the DrinkOrders in the ListBox. In this lesson, we are following the industry standard practice of displaying ListBox items in an ItemTemplate which is implemented as a DataTemplate.
The MainPage should stay focused on a consistently high level of display concerns, not the minutia of presenting a DrinkOrder in a ListBox. It should only have "main page" XAML. Therefore, we’ll put the DataTemplate in a separate ResourceDictionary and import that dictionary in the MainPage.
1. Select the Views folder.
2. Add | New Item | Silverlight Resource Dictionary | "DrinkOrderDataTemplate.xaml"
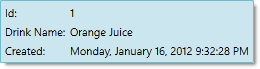
We'll display a DrinkOrder on three lines like this:
3. Define the DrinkOrderDataTemplate as follows:
| XAML | <ResourceDictionary xmlns="http://schemas.microsoft.com/winfx/2006/xaml/presentation" xmlns:x="http://schemas.microsoft.com/winfx/2006/xaml" xmlns:cal="http://www.caliburnproject.org"> <DataTemplate x:Key="DrinkOrderDataTemplate"> <Grid cal:Bind.ModelWithoutContext="{Binding}" > <Grid.Resources> <!-- Re-implemented implicit styles for non-Controls --> <Style BasedOn="{StaticResource DefaultTextBlock}" TargetType="TextBlock" /> </Grid.Resources> <Grid.RowDefinitions> <RowDefinition /> <RowDefinition /> <RowDefinition /> </Grid.RowDefinitions> <Grid.ColumnDefinitions> <ColumnDefinition /> <!-- column for labels --> <ColumnDefinition /> <!-- column for values --> </Grid.ColumnDefinitions> <TextBlock Text="Id:" Grid.Row="0" Grid.Column="0" Padding="2" /> <TextBlock Text="Drink Name:" Grid.Row="1" Grid.Column="0" Padding="2" /> <TextBlock Text="Created:" Grid.Row="2" Grid.Column="0" Padding="2" /> <TextBlock x:Name="Id" Grid.Row="0" Grid.Column="1" Padding="2" /> <TextBlock x:Name="DrinkName" Grid.Row="1" Grid.Column="1" Padding="2" /> <TextBlock x:Name="Created" Grid.Row="2" Grid.Column="1" Padding="2" Text="{Binding Created, StringFormat=\{0:F\}}" /> </Grid> </DataTemplate> </ResourceDictionary> |
The Grid is typical for this kind of item display. It has three rows and two columns, the left column holding labels and the right holding the data values.
There is a Caliburn namespace at the top: xmlns:cal="http://www.caliburnproject.org". We could have bound the controls explicitly. But we want to use the same convention based binding that we’ve enjoyed to this point. We have to reach out to Caliburn to get that.
The Grid element carries an attached property: cal:Bind.ModelWithoutContext="{Binding}" that triggers convention-based binding of the template controls to the template’s runtime DataContext … which we know will be a DrinkOrder. Without this attached property, the view controls would just sit on the screen, unbound and inert.
The style resource for the TextBlock may surprise you; it surprised me. We defined an implicit style for the TextBlock in HappyHourStyles which is a ResourceDictionary in the App.xaml. That style should apply here automatically. It won't for reasons explained below. We have to re-specify it somehow, perhaps with explicit styles or, as here, by re-implementing the TextBox implicit style in the context of the template.
Finally, notice that the "Created" TextBlock has an explicit binding:
| XAML | <TextBlock x:Name="Created" ...Text="{Binding Created, StringFormat=\{0:F\}}" /> |
We’ve decided to format the Created date in a more pleasing way with the Binding’s StringFormat attribute. That requires a custom binding which we must write explicitly.
Add the DataTemplate to the MainPage
1. Open MainPage.xaml.
2. Add Resources to the MainPage.xaml.
3. Add the DrinkOrderDataTemplate dictionary to the resources.
Here’s the resulting XAML:
| XAML | <UserControl.Resources> <ResourceDictionary> <ResourceDictionary.MergedDictionaries> <ResourceDictionary Source="/HappyHour;component/Views/DrinkOrderDataTemplate.xaml"/> </ResourceDictionary.MergedDictionaries> </ResourceDictionary> </UserControl.Resources> |
4. Build and run [F5].
After adding a drink name and pressing the button you should see:
Last Call
We created our first Model entity … a fake entity to be sure … and presented it in a ListBox in the standard way: with a DataTemplate.
The DataTemplate was bound by convention to the DrinkOrder when we added an attached property (cal:Bind.ModelWithoutContext) to the top element, the Grid.
We needed some ceremonial code to make it work. We re-implemented the TextBlock implicit style. We had to import the DataTemplate into the MainPage as a DictionaryResource.
In the next lesson, we’ll try an alternative. We’ll replace the DataTemplate with a View class derived from UserControl.
Ask the Mixologist
This lesson is finished. Feel free to move on directly to the next one. This "Ask the Mixologist" section is an optional digression from the lesson’s main course to related points of interest.
Why create a Model project for DrinkOrder?
The DrinkOrder class is less than 20 lines of demo code. Why go to the trouble of creating a separate Model project? Couldn’t you simply add it to the main application project (HappyHour) and refactor to a Model project later … when you’re sure you need to?
Yes you could. But we suggest you follow our lead and isolate the model right now. Your model (not the tutorial model) is going to grow soon and, when it does, you’ll be glad it’s in its own project. Do it now and you avoid the circular dependencies between UI and Model components that can be difficult to disentangle when you discover them much later.
We know the agile axiom that urges you to "do the simplest thing that could possibly work." That seems to argue against the Model project. Well, it doesn’t. Keeping the model in the application project can’t possibly work for long. The application project is dedicated to presentation; the model is separate, operating at a different layer. Distinct layers belong in their own assemblies.
The Model project is darned near the "simplest thing" you can do anyway. It takes less than a minute to create the Model project. After that, adding a class to the Model project is no more challenging than adding it to the application project. The Model project never slows you down and the clarity and maintenance benefits of a Model project are apparent as soon as you add a few more entities.
The "keep it simple" axiom exists to inhibit over-engineering, that expensive, time-consuming investment in complex designs for functionality to meet circumstances that may arise … someday.
Model growth is not an imaginary risk. It is a dead certainty that your model will exceed thirty entities within a cycle or two at most – not in this tutorial but definitely in your real project backed by real user stories. Experience teaches that a thirty entity model is sufficient to justify a separate project.
Seize the opportunity to do the "right thing" while the cost is low and the doing of it is all but inevitable.
Should a property always notify the View?
The DrinkOrders property is implemented with a simple auto-property.
| C# | public BindableCollection<DrinkOrder> DrinkOrders { get; private set; } |
Yet when we added the SelectedDrinkOrder property, we implemented it with a backing field and change notification.
| C# | private DrinkOrder _selectedDrinkOrder; public DrinkOrder SelectedDrinkOrder { get { return _selectedDrinkOrder; } set { _selectedDrinkOrder = value; NotifyOfPropertyChange("SelectedDrinkOrder"); } } |
Change notification alone forced us to write nine lines of boilerplate code. Why did we write those lines for SelectedDrinkOrder and not for DrinkOrders? Because SelectedDrinkOrder requires change notification and DrinkOrders does not.
The SelectedDrinkOrder changes every time the user clicks a button and adds a new drink.
| C# | public void AddDrinkOrder() { var drink = new DrinkOrder {DrinkName = DrinkName}; DrinkOrders.Add(drink); SelectedDrinkOrder = drink; } |
The ViewModel must tell the View about the new selected drink.
On the other hand, the DrinkOrders collection property never changes. The private setter is called exactly once, in the constructor, before the View can bind to it. The property always delivers the same collection instance even though the contents of the collection change.
If you want to play it safe … and you don’t mind a verbose ViewModel … you can implement every public property with a backing field and change notification. You’ll be consistent and maybe you have better things to think about than whether change notification is necessary. It never hurts.
I personally prefer the single-line economy of the auto-property. There is less code to wade through (one line versus nine) which may not matter in a small ViewModel but substantially obscures the purpose of a class with many properties.
A simple rule tells you when you need change notification and when you don’t:
Add change notification if the ViewModel can set the property.
Ultimately, this is a matter of personal and team preference.
Why re-implement the TextBlock implicit style?
We define implicit control styles in the HappyHourStyles.xaml dictionary and we merge that dictionary into the App.xaml because want these styles to apply everywhere in our application.
They are applied automatically in View classes derived from UserControl. They are applied automatically within DataTemplates as well ... but only to the elements that inherit from the Control class as explained here. Elements that are not Controls are not styled implicitly. They’re on the other side of something Microsoft calls “an encapsulation boundary.”
Templates are viewed as an encapsulation boundary when looking up an implicit style for an element which is not a subtype of Control.
TextBlock is not a Control; it’s a FrameworkElement. The implicit style for TextBlock does not flow through to the TextBlocks in our template. Microsoft says this is “by design.”
You are forgiven if the subtlety of the distinction is lost on you. Very few people know about this wrinkle; you could waste hours trying to figure out why your implicit styles weren't working. Of the remedies, we think re-implementing the implicit TextBlock style inside the template is the least onerous.