
General Actions:


DevForce Resource Center » Samples » Model code samples » Code sample: Code First Walkthrough (WPF) » Code sample: Code First Walkthrough: From New Project to Running
Last modified on September 26, 2012 18:25
Contents
This tutorial shows how to build a simple WPF application using Code First. Define a single-entity (Category) model, add instances of it to a development database, query them back, format them as strings, and display them on screen as logged messages.
- Platform: WPF
- Language: C#
- Download: Code First Walkthrough
Before You Start
This walkthrough uses SQL Server Express, which integrates directly with Entity Framework's Code First feature. If you want to use a non-Express edition of SQL Server, see "Living without SQL Server Express".
Create New Project
1. File | New | Project | DevForce 2012 | DevForce WPF Application.
The DevForce WPF Application project template includes references to all required NuGet packages, and will install these packages when the solution is first built. Be sure to enable the package restore feature in Visual Studio.
2. Name it CodeFirstWalk.
MainWindow.xaml: Our first taste of WPF UI
1. Open MainWindow.xaml. Make sure the XAML pane is showing.
2. Make the window wider. Width=800 is ok.
| C# | Title="MainWindow" Height="350" Width="800"> |
3. Add a two-row grid with a title in the top row and a ListBox to display messages in the second row. We’re using data binding right away, binding the ListBox’s ItemSource to a collection property called Messages.
| C# | <Grid> <Grid.RowDefinitions> <RowDefinition Height="40" /> <RowDefinition Height="Auto" /> </Grid.RowDefinitions> <TextBlock Text="Code First Walk in WPF" FontSize="20" TextAlignment="Center" VerticalAlignment="Center"/> <ListBox x:Name="messages" Grid.Row="1" ItemsSource="{Binding Messages}" /> </Grid> |
4. Close all windows (Alt-W, L).
We’ll return to the UI soon.
Create a Model
1. Add | New Item | Class.
2. Name it Model.
3. Delete the template generated Model class.
4. Add the Category class below.
| C# | [ProvideEntityAspect] public class Category { public int CategoryId { get; set; } public string CategoryName { get; set; } } |
The ProvideEntityAspect attribute requires us to add using IdeaBlade.Aop;.
Add custom EntityManager
We’ll start by creating it in this same Model.cs file.
1. At the top of the file, define the following custom “ProductEntities” EntityManager class
| C# | public class ProductEntities : EntityManager {} |
The EntityManager class requires using IdeaBlade.EntityModel;.
2. Add the “Categories” EntityQuery property so it’s easier for us to build queries of Category entities.
| C# | public EntityQuery<Category> Categories { get; set; } |
Build First Time
1. Build the solution (“Ctrl-Shift-B”). This is the first build with Code First model.
(If you received a build error indicating that SQL Server Express is not installed, see this section: Living without SQL Server Express).
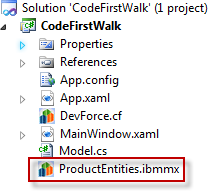
Notice it generates “ProductEntities.ibmmx” into the project.
2. Look at the Build output in the Output window.
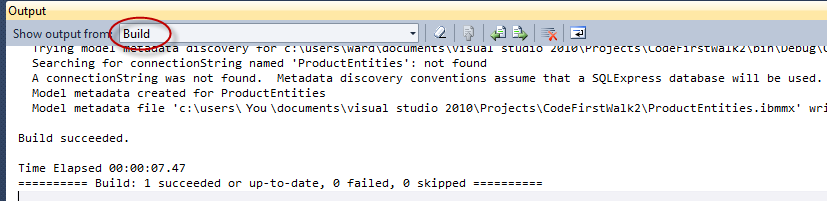
You should always build soon after changing the model and confirm that DevForce (re)generated the metadata “.ibmmx” file.
Create a ViewModel
Yes, we’ll use the MVVM pattern in this example. It’s super easy.
1. Add | New Item | Class.
2. Name it MainWindowViewModel.
3. Make it a public class.
4. Add a parameterless constructor.
5. Call the following four methods:
| C# | Start(); SetManager(); AddTestData(); ShowTestData(); |
6. Let Visual Studio (or R#) create stubs for these methods (work bottom up so the stubs are created top down).
Start()
1. Delete the line throwing a NotImplementedException.
2. Initialize a Messages collection property to hold our string messages (remember back in the UI we said we’d bind to it).
| C# | Messages = new ObservableCollection<string>(); |
The ObservableCollection class requires “using System.Collections.ObjectModel;”
3. Next call a Log(…) method that we’ll soon write:
| C# | Log("Starting application"); |
4. Let Visual Studio (or R#) create the stub for the Log method.
5. Add a public Messages auto-property just below the Start method.
6. At this point, this section looks like so:
| C# | private void Start() { Messages = new ObservableCollection<string>(); Log("Starting application"); } public ObservableCollection<string> Messages { get; set; } private void Log(string startingApplication) { throw new NotImplementedException(); } |
7. Implement the Log method such that it inserts a numbered message at the front of the Messages collection. This gambit causes more recent messages to appear at the top our messages ListBox. The implementation follows:
| C# | private void Log(string message) { message = String.Format("{0}: {1}", ++_messageCounter, message); Console.WriteLine(message); Messages.Insert(0, message); // new messages in front } private int _messageCounter; |
8. We are logging to the Visual Studio Console window for good measure.
SetManager()
We create and initialize your custom EntityManager here.
1. Delete the line throwing a NotImplementedException.
2. Instantiate your ProductEntities class and assign it to a Manager property.
3. Add a private Manager auto-property just below the SetManager method.
The server may not always be kind. An exception thrown on the server will be sent to the client and surfaced here as an EntityServerException. We can catch them here in an EntityServerError event handler which will (a) indicate that we’re handling the error, (b) log the problem, and (c) undo any pending changes in the EntityManager that may be the source of the problem.
4. We can define the handler in a lambda. The result is as follows:
| C# | private void SetManager() { Manager = new ProductEntities(); Manager.EntityServerError += (s, e) => { e.Handled = true; // we're dealing with it here Log("Server error: " + e.Exception.Message); Manager.RejectChanges(); // undo pending changes }; } private ProductEntities Manager { get; set; } |
5. You might want to add a breakpoint to the first line in the lambda expression in case we get an error and want to see the entire exception.
AddTestData()
1. Delete the line throwing a NotImplementedException.
2. Create a new Category entity and set its name.
| C# | var cat = new Category {CategoryName = "Sweet Things on " + DateTime.Now.ToString("o")}; |
3. Add it to the Manager, Log the fact that we are saving now, and call SaveChanges.
| C# | Manager.AddEntity(cat); Log("Saving new test data"); Manager.SaveChanges(); |
4. The AddTestData method should look like this:
| C# | private void AddTestData() { var cat = new Category { CategoryName = "Sweet Things on " + DateTime.Now.ToString("o") }; Manager.AddEntity(cat); Log("Saving new test data"); Manager.SaveChanges(); } |
ShowTestData()
1. Delete the line throwing a NotImplementedException.
2. We’ll log the fact that we’re showing test data:
| C# | Log("Showing test data"); |
3. Query for all Category entities. This will pick up both the one we just added and any others that are lurking in the database from previous application sessions.
Add this query:
| C# | var cats = Manager.Categories.ToList(); // get 'em all |
4. Log the categories we fetched, using a helper method:
| C# | cats.ForEach(LogCats); |
ToList() and ForEach() require using System.Linq;.
5. Let Visual Studio (or R#) create the stub for the LogCats method.
- Change the obj parameter name to cat.
- Set format string: var fmt = "Category {0} Name={1}";.
- Call Log: Log(string.Format(fmt, cat.CategoryId, cat.CategoryName));.
The ShowTestData and LogCats methods should look like this:
| C# | private void ShowTestData() { Log("Showing test data"); var cats = Manager.Categories.ToList(); // get 'em all cats.ForEach(LogCats); } private void LogCats(Category cat) { var fmt = "Category {0} Name={1}"; Log(string.Format(fmt, cat.CategoryId, cat.CategoryName)); } |
Create the ViewModel in the View
Time to tie the View (MainWindow.xaml) to the ViewModel (MainWindowViewModel.cs). We’ll do that in the view’s code behind.
1. Open MainWindow.xaml.cs.
2. Delete every using except “System.Windows” (optional).
In the constructor, assign the view’s DataContext with a new instance of the MainWindowViewModel ViewModel class. The constructor looks like this when you’re done.
| C# | public MainWindow() { InitializeComponent(); DataContext = new MainWindowViewModel(); } |
Run in Debug [F5]
It builds again. This time the build messages in the output window end as follows:
Model metadata created for ProductEntities
Model metadata for ProductEntities.ibmmx is unchanged
Model metadata for ProductEntities.ibmmx is unchanged
The metadata “ibmmx” file is unchanged. But the assembly has been changed … because now that metadata file is embedded in the CodeFirstWalk.exe assembly.
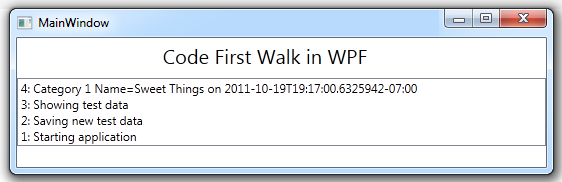
The application runs. And it works!
The messages appear top down in reverse order. At the top is the Category we just created.
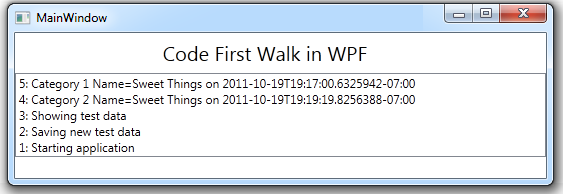
Run the app again and you’ll see two Categories in the application window, the one we created in the previous session and the new one we just added.
How is that possible? We haven’t defined a database. We haven’t even named a database.
In the first session, when the AddTestData() method asked the EntityManager to save the new Category, the EntityManager issued the first command that requires a database. Somewhere in the chain of events that followed, DevForce gave the Entity Framework the name of a connection string. In our example, it supplied the name of the EntityManager class (“ProductEntities”).
Because there is no “ProductEntities” connection string in the app.config file, the Entity Framework Code First creates a database to match our entity model in SQL Server Express and calls it “ProductEntities”.
Examine the database in SQL Server Management Studio:
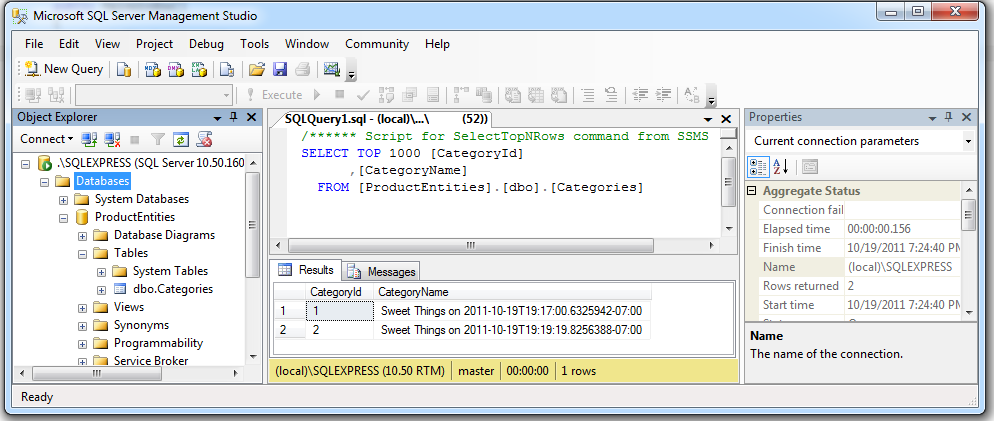
The database exists and has a “Categories” table with the two rows displayed in the UI.
Summary
In this part of the “Code First Walk” we
- Created a new DevForce WPF Application
- Defined a DevForce entity model entirely in code using “Code First”
- Put our entity access code in a simple ViewModel and bound that ViewModel to the View.
- Added new entities, saved them, and queried them back from the database.
- Let the Entity Framework create a database to match our Model.
Appendix: Common Build Errors
You got a build error such as the following:
An error occurred during metadata generation and a metadata file could not be created. Error: A connectionString was not found. Since SQLExpress is not installed DevForce metadata discovery cannot continue. Add a .config file with a connectionString named 'ProductEntities' to this project. Providing a connection string at build time ensures that the correct model metadata is generated.
Entity Framework, by default, expects you to have installed Microsoft SQL Server Express. You can get around that by specifying a connection string in a configuration file or change the default database server to SQL Server by setting the DefaultConnectionFactory. These options are discussed in the Advanced Database Connection Options topic of the DevForce Resource Center.
If you don't have SQL Server Express but do have the full SQL Server installed, try adding the following static constructor to the ProductEntities. Remember to look closely at the parts of the baseConnectionString to ensure they match your SQL Server name.
| C# | public class ProductEntities : EntityManager { static ProductEntities() { // Set base connection string const string baseConnectionString = "Data Source=.; " + // your SQL Server name "Integrated Security=True; " + "MultipleActiveResultSets=True; " + "Application Name=CodeFirstWalk"; // change to suit your app Database.DefaultConnectionFactory = new SqlConnectionFactory(baseConnectionString); } // elided. } |