
General Actions:


DevForce Resource Center » Samples » Model code samples » Code sample: Code First Walkthrough (WPF) » Code sample: Code First Walkthrough: Update the Model and Bind to it
Last modified on September 20, 2012 10:37
Contents
DevForce AOP entities are more than bags of data stored in a database. They can participate in client UIs. They have hidden infrastructure for caching, navigation to related entities, for data binding and validation and change tracking.
Last time we established that an entity class could be built entirely in code. Instances of that type could be created and saved. But we didn’t show related entities and we merely dumped entity property values into strings displayed on screen.
This time, we show that you can add entities to the model quickly, relate them to each other, and bind to them in XAML.

- Platform: WPF
- Language: C#
- Download: Code First Walkthrough
Add a Product entity to the Model
1. Open the Model class and add the following Product class definition:
| C# | [ProvideEntityAspect] public class Product { public int ProductId { get; set; } public string ProductName { get; set; } public int CategoryId { get; set; } // Foreign key for "Category" public Category Category { get; set; } } |
Notice that Product has a navigation property to its parent Category. We could add a navigation property from Category back to its child products … but we do not have to do so and we won’t in this example.
2. Add a convenience Product query property to ProductEntities, which is our custom EntityManager.
| C# | public EntityQuery<Product> Products { get; set; } |
3. Build again to save the model and re-generate metadata.
Update the View
1. Open the View, MainWindow.xaml. Make sure the XAML pane is showing.
2. Add a row to the grid by adding a RowDefinition. There should be three now.
| XAML | <Grid.RowDefinitions> <RowDefinition Height="40" /> <RowDefinition Height="Auto" /> <RowDefinition Height="*" /> </Grid.RowDefinitions> |
3. Add a GridSplitter to separate the second and third rows and enable the user to show more or less of row #2.
| C# | <GridSplitter Grid.Row="2" HorizontalAlignment="Stretch" VerticalAlignment="Top" Height="8"/> |
4. Add a ListBox to row #2.
5. Bind the ListBox.ItemSource to the Products collection property in the ViewModel; we haven’t written that property yet but we will soon.
6. Bind the ListBox.SelectedItem to another future ViewModel property, the SelectedProduct, such that the user’s choice is communicated to the ViewModel.
7. Bind the ListBox.ItemTemplate to the soon-to-be-added ProductTemplate in order to present a well-formatted product to the user for each item in the Products collection.
Here’s the finished ListBox xaml.
| XAML | <ListBox x:Name="productsListBox" Grid.Row="2" Margin="0,10,0,0" SelectedItem="{Binding SelectedProduct, Mode=TwoWay}" ItemsSource="{Binding Products}" ItemTemplate="{StaticResource ProductTemplate}"/> |
8. Scroll nearly to the top of the xaml, just above the <Grid> tag.
9. Add the following Product DataTemplate in a Window.Resources tag:
| XAML | <Window.Resources> <DataTemplate x:Key="ProductTemplate"> <Grid> <Grid.RowDefinitions> <RowDefinition Height="Auto" /> <RowDefinition Height="Auto" MinHeight="30"/> <RowDefinition Height="Auto" MinHeight="30"/> <RowDefinition Height="20" /> </Grid.RowDefinitions> <Grid.ColumnDefinitions> <ColumnDefinition Width="Auto" /> <ColumnDefinition Width="Auto" /> <ColumnDefinition Width="Auto" /> <ColumnDefinition Width="Auto" /> <ColumnDefinition Width="Auto" /> <ColumnDefinition Width="Auto" /> </Grid.ColumnDefinitions> <TextBlock Text="Product: " Grid.Row="0" Grid.Column="0" VerticalAlignment="Center" /> <TextBlock Text="{Binding ProductId}" Grid.Row="0" Grid.Column="1" VerticalAlignment="Center" Margin="2,0,2,0" MinWidth="20"/> <TextBox Text="{Binding ProductName, Mode=TwoWay, ValidatesOnDataErrors=True}" Grid.Row="0" Grid.Column="2" VerticalAlignment="Center" Margin="2,0,2,0" MinWidth="100"/> <TextBlock Text="NotPersisted: " Grid.Row="0" Grid.Column="3" VerticalAlignment="Center" Margin="8,2,0,0"/> <TextBox Text="{Binding NotPersisted, Mode=TwoWay, ValidatesOnDataErrors=True}" Grid.Row="0" Grid.Column="4" VerticalAlignment="Center" MinWidth="100"/> <TextBlock Text="{Binding EntityAspect.EntityState}" Grid.Row="0" Grid.Column="5" VerticalAlignment="Center" Margin="8,0,0,0"/> <TextBlock Text="Category: " Grid.Row="1" Grid.Column="0" VerticalAlignment="Center" Margin="8,0,0,0"/> <TextBlock Text="{Binding CategoryId}" Grid.Row="1" Grid.Column="1" VerticalAlignment="Center" Margin="2,0,2,0" MinWidth="20"/> <TextBox Text="{Binding Category.CategoryName, Mode=TwoWay, ValidatesOnDataErrors=True}" Grid.Row="1" Grid.Column="2" VerticalAlignment="Center" Grid.ColumnSpan="4" /> <TextBlock Text="Supplier: " Grid.Row="2" Grid.Column="0" VerticalAlignment="Center" Margin="8,0,0,0" /> <TextBox Text="{Binding Supplier.CompanyName, Mode=TwoWay, ValidatesOnDataErrors=True}" Grid.Row="2" Grid.Column="2" VerticalAlignment="Center" Grid.ColumnSpan="4"/> </Grid> </DataTemplate> </Window.Resources> |
Wow … that’s a lot of Xaml!
We won’t need all of it right away. If you bother to read it, you’ll see bindings to properties and types we haven’t defined yet.
There is nothing surprising in it if you know Xaml binding, no pretense that you’ll do other than paste this into your example if you choose to follow along, and no point in pasting more template xaml later.
Revise the UI to show Products
We next create some new Product entities and display them.
1. Open the MainWindowViewModel class and go to the AddTestData() method.
2. Refactor the category creation into a AddNewCategory() method and a CurrentCategory property.
| C# | private void AddNewCategory() { CurrentCategory = new Category { CategoryName = "Sweet Things on " + DateTime.Now.ToString("o") }; Manager.AddEntity(CurrentCategory); } private Category CurrentCategory { get; set; } |
3. Write an AddNewProduct() method
| C# | private Product AddNewProduct(string productName = "A new product") { var newProduct = new Product { ProductName = productName, Category = CurrentCategory, }; //Manager.AddEntity(newProduct); // harmless but unnecessary return newProduct; } |
A few noteworthy points:
- The caller can supply a new product name or the method will supply a default name
- Although the method does not add the new Product instance to the Manager explicitly, setting the Category to an entity already in the Manager (CurrentCategory) draws the new Product in.
- You could add it to the Manager explicitly if you wished; there’s no harm in adding it twice.
4. Revise the AddTestData method to use these new ViewModel members:
| C# | private void AddTestData() { AddNewCategory(); AddNewProduct("Chocolate Cream Pie"); AddNewProduct("Baklava"); Log("Saving new test data"); Manager.SaveChanges(); } |
5. Go to ShowTestData() where we’ll display the new products.
6. Add a Products property just below ShowTestData(); this the data bound collection of Products to show.
| C# | public ObservableCollection<Product> Products { get; set; } |
7. Query for Products.
This time instead of querying for Categories, we will query for Products. We also tell DevForce to “Include” … to bring along … the parent Category when it fetches Products.
Include is a DevForce extension method; we require “using IdeaBlade.EntityModel;”
| C# | var productQuery = Manager.Products.Include("Category"); |
We’ve defined the query but we haven’t run it. No entities have been retrieved yet.
Initialize Products collection with the query results.
| C# | Products = new ObservableCollection<Product>(productQuery); // executes & adds to list |
The constructor of ObservableCollection<T> sees the query as an IEnumerable<T>. It unintentionally executes the query (once) as a by-product of iterating over it.
8. Go “CacheOnly”
We’d like to prove that we really are bringing in the Category when we retrieve a Product. We don’t want the Product’s Category property, as in “someProduct.Category”, to do a lazy load.
One way to prevent a lazy load is to tell the Manager that it may no longer query the database by default. We change the Manager’s DefaultQueryStrategy to “CacheOnly”.
| C# | // DEMO ONLY – DO NOT DO THIS IN YOUR CODE Manager.DefaultQueryStrategy = QueryStrategy.CacheOnly; // let's see only what's in cache |
The final state of the ShowTestData method is:
| C# | private void ShowTestData() { Log("Showing test data"); var productQuery = Manager.Products.Include("Category"); Products = new ObservableCollection<Product>(productQuery); // executes & adds to list // DEMO ONLY - DO NOT DO THIS IN YOUR CODE Manager.DefaultQueryStrategy = QueryStrategy.CacheOnly; // let's see only what's in cache } |
9. Delete all logging of Categories, both the line in this method and the LogCats method.
10. Review the ProductTemplate in Window.xaml (optional).
You’ll find a line in the product's DataTemplate that binds to the CategoryName:
| XAML | <TextBox Text="{Binding Category.CategoryName, Mode=TwoWay, ValidatesOnDataErrors=True}" ... /> |
Notice how it navigates from Product (the implicit DataContext) to Category and from there to CategoryName. That works because (a) DevForce injects cache navigation into the Product.Category property and (b) the related Category instance is already in cache when the binding is exercised, thanks to the “Include” query.
F5 – Build and Run (fail)
The window reports failures during save and query. Good thing we’re logging failures!
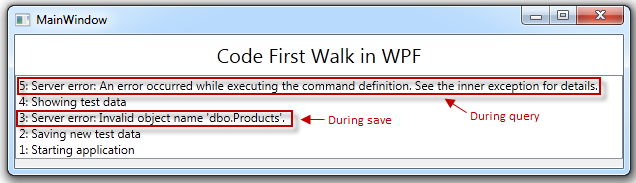
The error message during the initial save tells us exactly what’s wrong: our model has a Product type but the database has no corresponding table. We’re trying to save Products but our database doesn’t know about products.
Because we told DevForce that we’ve handled the exception, the application keeps going and fails again trying to query for products. The outer exception message isn’t useful but if we stop the application (Shift-F5), put a breakpoint on the EntityServerError handler, run again, and see what the inner exception has to say:
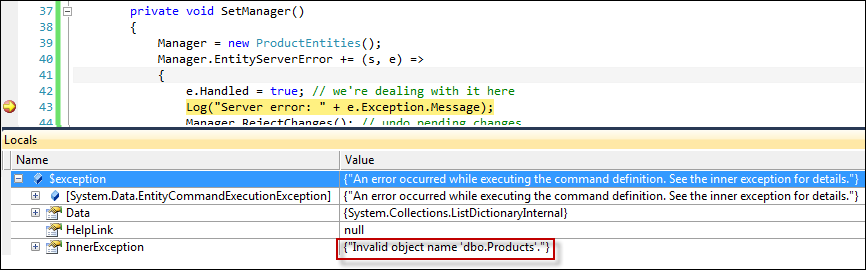
It’s the same problem. We’re trying to query for Products but which our database knows nothing about them.
The database is junk anyway so we can drop the “ProductEntities” database, using SQL Server Management Studio.
Run again (F5). Entity Framework creates the database this time and the application works.
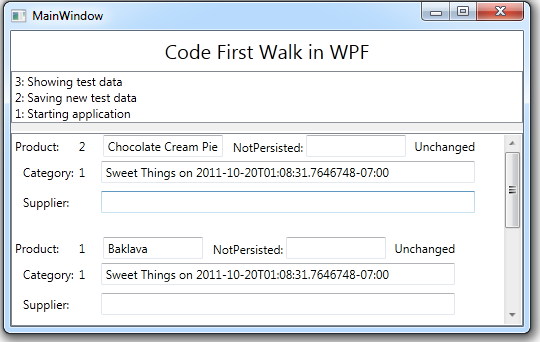
The text value “Unchanged” comes from the EntityState property of every DevForce entity by way of its EntityAspect property as we see in the pertinent data binding line from the ProductTemplate.
| XAML | <TextBlock Text="{Binding EntityAspect.EntityState}" Grid.Row="0" Grid.Column="5" |
It means that the Product hasn’t changed since we saved it. When we change “Chocolate Cream Pie” to “Chocolate Rabbit” and tab out, the displayed EntityState value becomes “Modified”.

DevForce infrastructure inside the Product entity is clearly at work:
- Change tracking detected the name change and altered the product’s EntityState.
- Change notification caused the form to refresh its display of the EntityState value.
You don’t remember writing an EntityAspect or EntityState property. You don’t remember implementing change notification either. That’s because you didn’t. Review the source code for Product; they aren’t there.
The entity acquired these properties and capabilities when it was re-written as a consequence of DevForce AOP.
Summary
In this part of the “Code First Walk” we
- added a new entity to the model … without using a designer or modifying the database.
- used eager loading (“Include”) to retrieve Categories with their Products.
- bound UI controls to entities, leveraging DevForce AOP entity data binding support.
- displayed the state of an entity by binding to the EntityAspect property injected into DevForce AOP entities.