
General Actions:


DevForce Resource Center » Samples » Model code samples » Code sample: Code First Walkthrough (WPF) » Code sample: Code First Walkthrough: Separate the Model Project
Last modified on September 26, 2012 19:08
Contents
Many of us prefer to keep our entity models in their own projects, separate from other applications projects … especially from the UI projects.
Of course we could have begun development of the “Code First Walk” application with an independent model project. But we didn’t because we were keeping it as simple as possible … as you might do.
Fortunately, it’s easy to move the model to its own project … as we do here.
- Platform: WPF
- Language: C#
- Download: Code First Walkthrough
Create the Model Project
1. Close all Visual Studio editor windows (Alt-W, L).
2. Add | New Project | Class Library
3. Name it “CodeFirstWalk.Model”.
4. Delete the template-generated “Class1”.
5. Install the DevForce Code First NuGet package.
You can install a NuGet package from either the "Manage NuGet Packages" wizard, or the Package Manager Console. For more information, see here.
The Code First package will also install the DevForce Client package, the EntityFramework package, and the PostSharp package. All required assembly references will also be added, and the DevForce Code First marker file will be added to the project.
6. Open the Model file.
7. Change all Model file namespaces to CodeFirstWalk.Model by using (Ctrl-H) “Global Replace” (for the model project only).
Replace all “namespace CodeFirstWalk” with “namespace CodeFirstWalk.Model”.

8. Build the Model project only. It should compile cleanly.
Adjust the Application Project
1. Go to the CodeFirstWalk application project.
2. Delete the following Model-oriented files:
- the “.ibmmx” file
- DevForce.cf
- Model.cs
- ProductDbContext.cs
3. Add project reference to CodeFirstWalk.Model.
4. Build the solution.
It will fail, complaining that it can’t find the model classes. The error messages tell you where you need to add “using CodeFirstWalk.Model;”. In our example, you only need to …
5. Add “using CodeFirstWalk.Model;” to MainWindowViewModel.
Disable PostSharp in the application project
You'll still need to keep the reference to PostSharp.dll in your project, but you no longer need PostSharp to rewrite the assembly, since the model is now in a different project. Remove the file RequiresPostSharp.cs (or RequiresPostSharp.vb) from the project.
Build and run [F5]
The application should run as it did before.
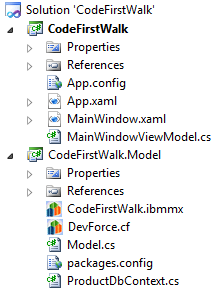
At the conclusion of Model separation, the solution structure should look like this:
Optional steps
1. Add an App.config file if necessary (optional).
If Entity Framework is (re)creating the development database for you (as we’ve asked it to do in this CodeFirstWalk sample) then you don’t need to add an App.config.
If you require design time access to a specific database - as you might if you hadn’t installed SQL Server Express on your development machine -, you may need to create an App.config file in the Model project.
- Add | New Item | Application Configuration File
- Copy only the <connectionStrings> tag (and its contents) from the App.config in your application project (CodeFirstWalk).
See the Metadata Generation and Advanced database connections topics for a discussion of the issues.