
General Actions:


DevForce Resource Center » Samples » Core concept code samples » Code sample: Hello DevForce (n-tier WPF)
Last modified on June 13, 2019 19:54
Contents
"Hello, DevForce" is a small application which walks you through many of the common steps in building an n-tier DevForce desktop application.
- Platform: WPF
- Language: C#
- Download: Hello DevForce (WPF)
Problem
The challenge: you'd like to build an n-tier DevForce desktop application but don't know where to begin. Maybe you've seen the quickie demo and tour, but want a few more details before you build your own application.
Solution
"Hello, DevForce" is a simple WPF application which is not about the UI. Instead, it shows how to choose a new project template, how to add an entity model project, and how to run the application n-tier. The concepts shown are not specific to WPF and apply to WinForms applications too.
Create a solution using a DevForce project template
DevForce installs several Visual Studio project templates; in this walk through we'll use the DevForce n-Tier WPF Application template.
In Visual Studio, choose File / New Project from the main menu; under Visual Basic or C#, find the DevForce templates; select the DevForce n-Tier WPF Application template; name and locate the new solution, and click OK.
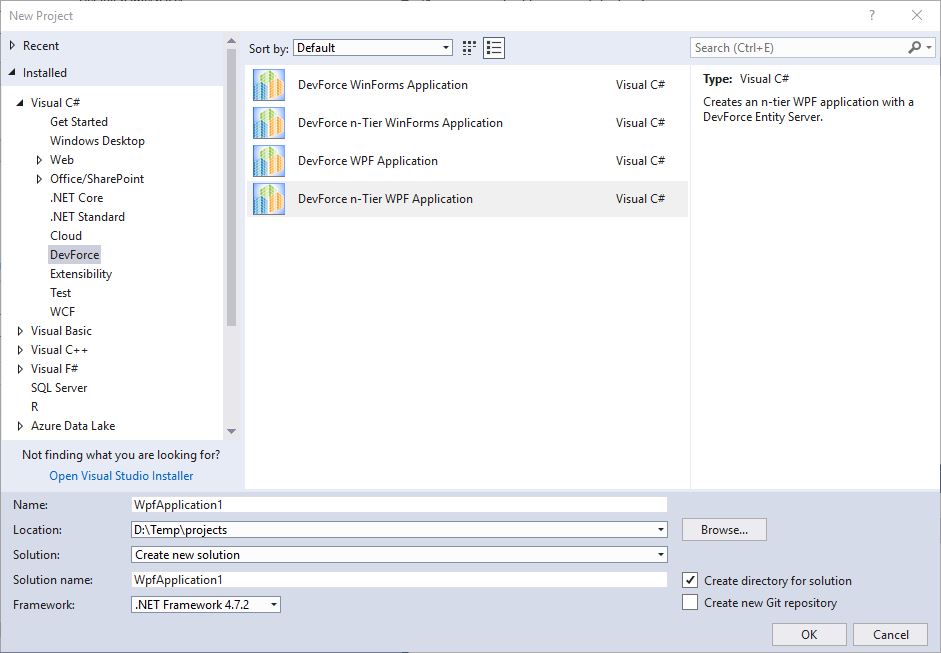
A two-project solution containing a WPF client project and a web application project is created. The appropriate DevForce Nuget packages are also automatically installed.
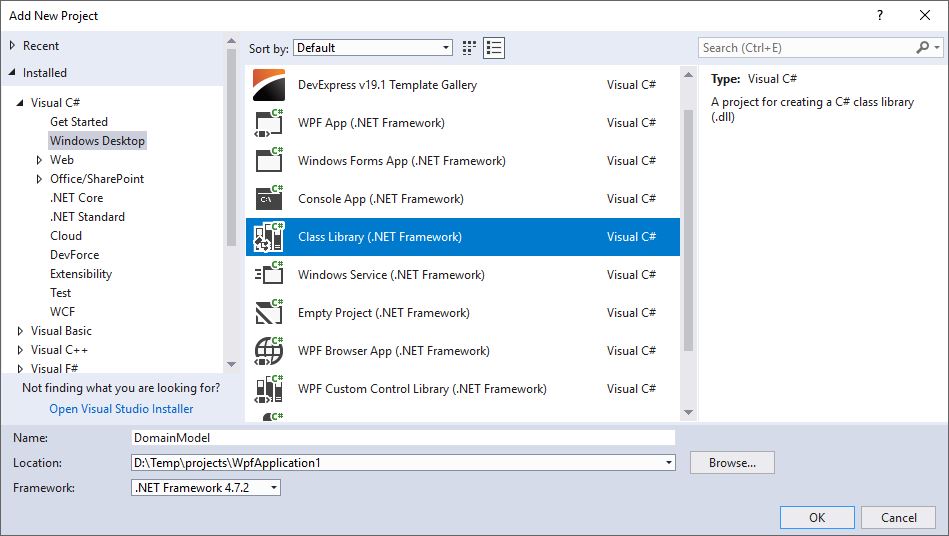
Add the entity model
Our next task will be to add the entity model. In a DevForce application, both the server-side and client-side applications need access to the domain model. We'll do that here by creating a separate project for the model.
Create a new Windows class library project in the solution. We'll call it “DomainModel” here.
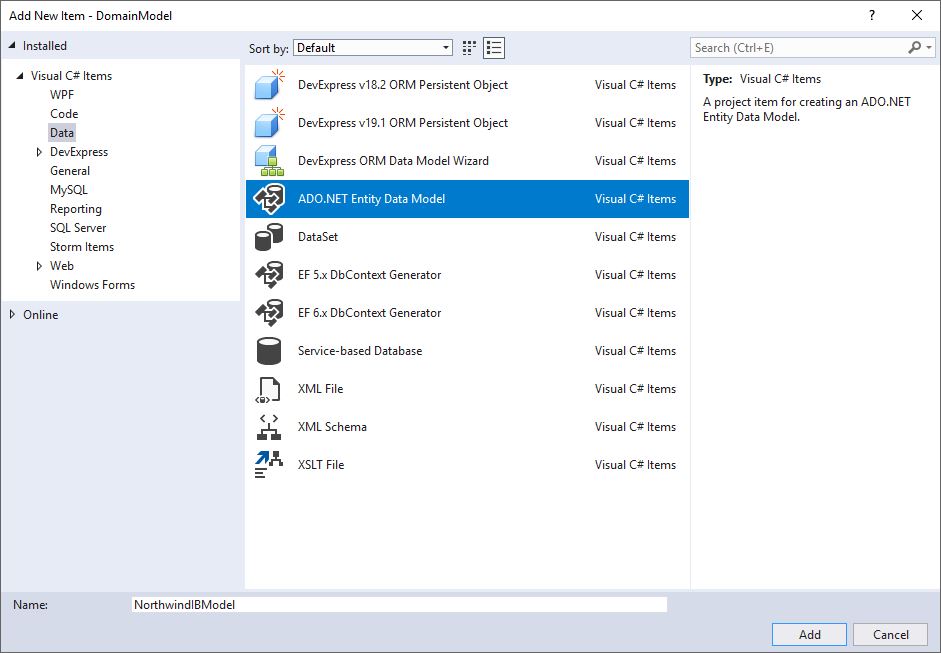
Delete the “Class1.cs” file that Visual Studio creates; we won’t need it.
To the DomainModel project, add a new item, an ADO.NET Entity Data Model. Name it “NorthwindIBModel”.
Clicking <Add> will launch a wizard to help you build your Entity Data Model:
- On the first dialog, accept the default choice of “EF Designer from database”. Click Next.
- On the “Choose Your Data Connection” dialog, select or create a connection to the NorthwindIB database, and tell Visual Studio to save the connection settings in app.config as “NorthwindIBEntityManager”. Click Next.
- On the "Choose Your Version" dialog, select Entity Framework 6.x. Click Next.
- On the "Choose Your Database Objects and Settings" dialog, expand the tables node and select the Customer table. A typical model can have scores of entities, but we're using just the one in this sample. Click Finish.
If you receive the following security warning message…
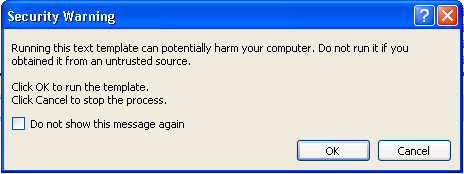
… click <OK> so that DevForce can use the Entity Data Model to generate a C# or VB domain model. Until you turn this warning off, you will see it whenever DevForce wants to regenerate your domain model code.
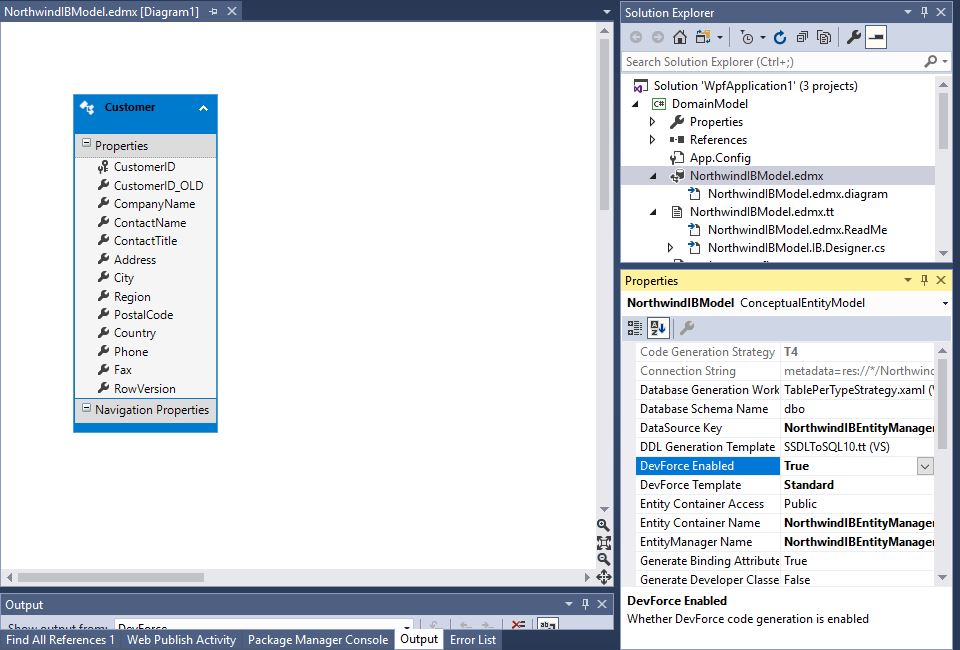
The EDM designer will create an XML file with extension .edmx to capture the information supplied using the wizard. Then it will render the newly created model visually. Click in white space in the designer window to see the model properties, and set "DevForce Enabled" to true to have DevForce generate the code for the model:
Write some code
There’s a great deal more we could do to refine our model, but it’s already sufficiently fleshed out to support data retrieval and persistence, so let’s see how we can use it to do that.
- Build the DomainModel project.
- Add references to the DomainModel assembly in the WpfApplication1 and WpfApplication1Web projects.
You may note that both of those projects already have references to several DevForce assemblies. These were put there by the project template that you used to create the solution initially. These templates add the latest DevForce Nuget packages to your projects.
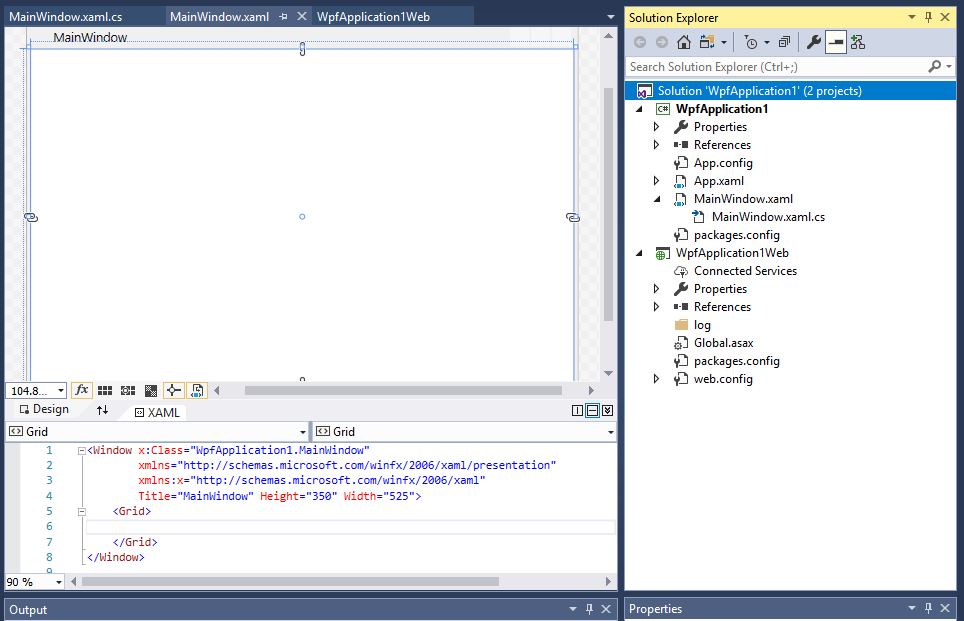
The DevForce project template created a WPF Application project, so let’s add some code to that. First we’ll flesh out the MainWindow window that the template created, by adding a TextBlock within a ScrollViewer inside the window’s layout grid.
The XAML we’re starting with is this:
| XAML | <Window x:Class="WpfApplication1.MainWindow" xmlns="http://schemas.microsoft.com/winfx/2006/xaml/presentation" xmlns:x="http://schemas.microsoft.com/winfx/2006/xaml" Title="MainWindow" Height="350" style="width:525px"> <Grid> </Grid> </Window> |
We’ll enhance that to this:
| XAML | <Window x:Class="WpfApplication1.MainWindow" xmlns="http://schemas.microsoft.com/winfx/2006/xaml/presentation" xmlns:x="http://schemas.microsoft.com/winfx/2006/xaml" Title="MainWindow" Height="350" style="width:525px"> <Grid> <ScrollViewer> <TextBlock Name="_outputTextBlock" TextWrapping="Wrap" FontFamily="Courier New" /> </ScrollViewer> </Grid> </Window> |
For the purpose of this very simple application, we’re going to use that TextBlock control like the output window of a Console application, and simply write output strings to it.
We could, of course, put code to retrieve and display data in the “code behind” area of the Window itself, but let’s just put ourselves off to a good start and build a very basic Model-View-ViewModel architecture so we can (a) keep our view extremely lightweight and (b) minimize the obstacles to our application’s testability.
We’ll create a class we’ll call MainWindowViewModel, give it a public string property named Output, and just bind our TextBlock to the value of that property:
| XAML | <Grid > <ScrollViewer> <TextBlock Name="_outputTextBlock" TextWrapping="Wrap" FontFamily="Courier New" Text="{Binding Output}" /> </ScrollViewer> </Grid> |
The MainWindow’s code behind starts out like this:
| C# | using System; using System.Collections.Generic; using System.Linq; using System.Text; using System.Windows; using System.Windows.Controls; using System.Windows.Data; using System.Windows.Documents; using System.Windows.Input; using System.Windows.Media; using System.Windows.Media.Imaging; using System.Windows.Navigation; using System.Windows.Shapes; namespace WpfApplication1 { /// <summary> /// Interaction logic for MainWindow.xaml /// </summary> public partial class MainWindow : Window { public MainWindow() { InitializeComponent(); } } } |
We’ll add a handler for the window’s Loaded event to do all of the following:
- Instantiate the view model;
- Set the view’s DataContext to that view model; and
- Call a Start() menu on the view model to initiate data retrieval and display.
| C# | using System; using System.Collections.Generic; using System.Linq; using System.Text; using System.Windows; using System.Windows.Controls; using System.Windows.Data; using System.Windows.Documents; using System.Windows.Input; using System.Windows.Media; using System.Windows.Media.Imaging; using System.Windows.Navigation; using System.Windows.Shapes; namespace WpfApplication1 { /// <summary> /// Interaction logic for MainWindow.xaml /// </summary> public partial class MainWindow : Window { public MainWindow() { InitializeComponent(); this.Loaded += new RoutedEventHandler(MainWindow_Loaded); } void MainWindow_Loaded(object sender, RoutedEventArgs e) { MainWindowViewModel aMainWindowViewModel = new MainWindowViewModel(); this.DataContext = aMainWindowViewModel; aMainWindowViewModel.Start(); } } } |
Note that we did not have to know that the view’s Loaded event handler had to be a RoutedEventHandler, etc.; we simply typed in “this.Loaded +=”, and then pressed the TAB key a couple of times to let Visual Studio set up an appropriate stub. We then filled in the code representing the actions we wanted to take place.
Now let’s create that MainWindowViewModel class. Add a new class by that name to the WpfApplication1 project and flesh out its code to look like this:
| C# | using System; using System.Collections.Generic; using System.Linq; using System.Text; using SysComp = System.ComponentModel; using DomainModel; using IdeaBlade.EntityModel; namespace WpfApplication1 { class MainWindowViewModel : SysComp.INotifyPropertyChanged { private NorthwindIBEntityManager _mgr = new NorthwindIBEntityManager(); string _output = ""; public void Start() { FirstSample(); } public void FirstSample() { StringBuilder aStringBuilder = new StringBuilder("Started FirstSample()...\n"); var customersQuery = from cust in _mgr.Customers where cust.ContactTitle == "Sales Representative" orderby cust.CompanyName select cust; aStringBuilder.Append(string.Format( "Retrieved {0} customers\n", customersQuery.ToList().Count)); foreach (Customer aCustomer in customersQuery) { aStringBuilder.Append(string.Format("Customer: {0}\n", aCustomer.CompanyName)); } Output = aStringBuilder.ToString(); } public string Output { get { return _output; } set { _output = value; RaisePropertyChanged("Output"); } } #region INotifyPropertyChanged public event SysComp.PropertyChangedEventHandler PropertyChanged = delegate { }; protected void RaisePropertyChanged(string propertyName) { PropertyChanged(this, new SysComp.PropertyChangedEventArgs( propertyName)); } #endregion } } |
Note a few things about our ViewModel:
- We made the class implement the INotifyPropertyChanged from the .NET namespace System.Component model. That interface requires the definition of an event name “PropertyChanged”, to be raised by an instance of this (MainWindowViewModel) class whenever the value of one of its public properties changes.
- We’ve defined exactly one such public property – a string property named “Output” – which when set will cause the PropertyChanged event to be fired. Most WPF and Silverlight user interface controls listen for this event and respond to it by refreshing themselves with current data from the source object to which they are bound. In our app, the TextBlock on MainWindow will get refreshed automatically whenever the value of Output is changed.
Beyond that, our view model, when the Start() method is run, simply submits a LINQ query requesting Customers who meet some condition; then uses that query to retrieve, first a count of such Customers, and then the Customer objects themselves. With each operation it writes text to the Output property.
Set the server port
The template assigned a default port of 9009 to the WpfApplication1Web project, and set IIS Express as the default web server for development. This port is often not available, so let's manually assign a new port for IIS Express - in this case we used 25000 - then click "Create Virtual Directory".

Modify the app.config
Now for the most important piece in setting up an n-tier application: tell the client app where the server is!
Open the App.config in the WpfApplication1 project. Find the objectServer entry, and change the serverPort to the one set in the step above, in this case 25000.
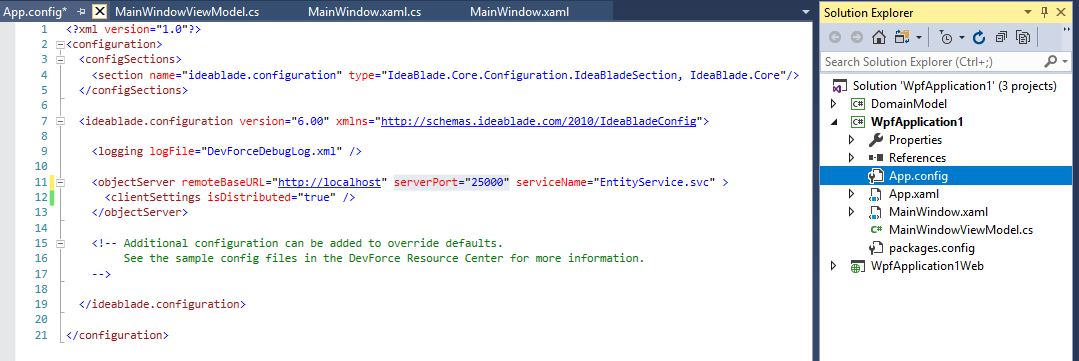
We don't yet need to worry about the settings for remoteBaseURL and serviceName, but will when we deploy to IIS.
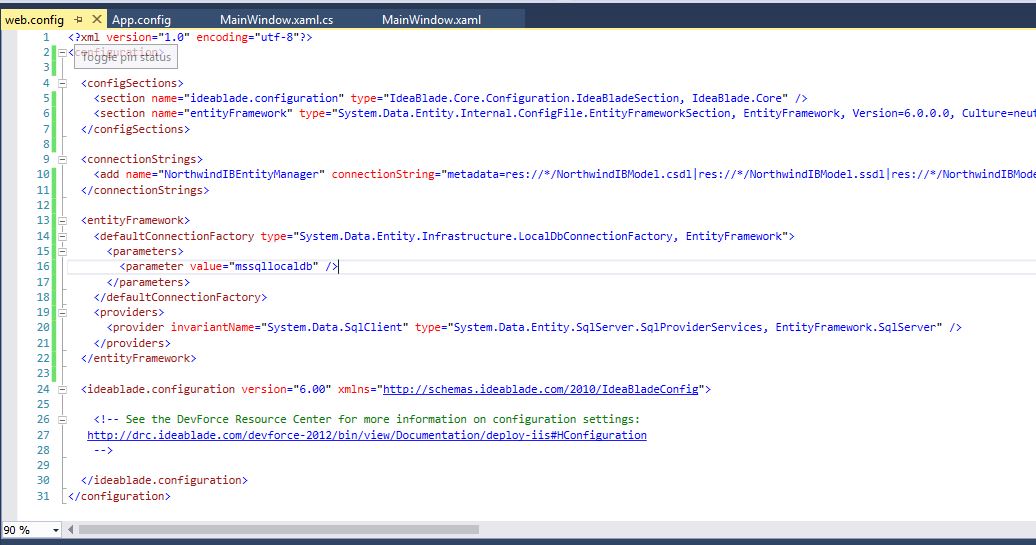
Modify the web.confg
Because we added the entity data model to the "DomainModel" project, EF added the connection string and other configuration settings to the app.config in that project. We now need to ensure the web project has the necessary information and references.
First, install the Entity Framework NuGet package to the web project:
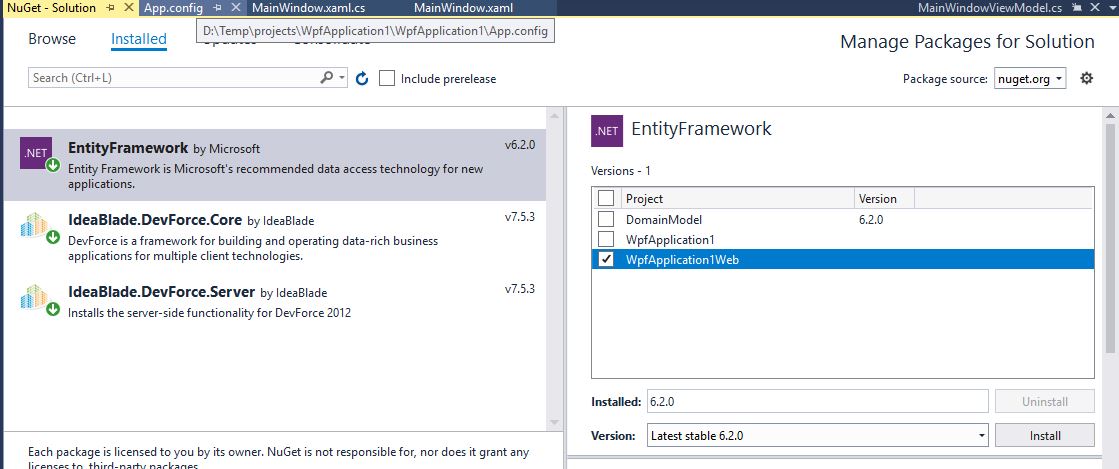
Next, copy the connectionStrings information over from the app.config in the DomainModel project to the web.config in the web project.
The final web.config will look like this:
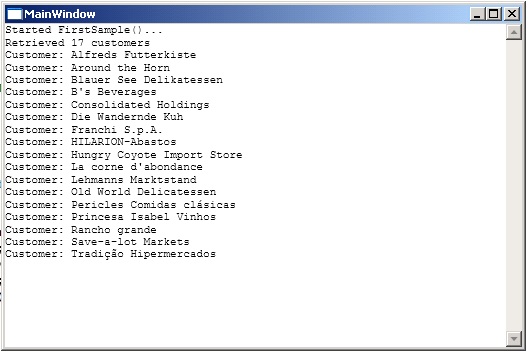
Run the app
Now we’re ready to run our app. Press F5 to start debugging. If "Always Start When Debugging" is set to true (the default) in the properties for WpfApplication1Web, IIS Express will start the web application, and the client application will also launch. The client app will connect to the EntityServer and send a query for customer data. You'll soon see the following:
If instead you get an error, check our troubleshooting page.
Publish
With an n-tier desktop application you'll typically deploy the client app and Entity Server to separate environments. This doesn't mean though that these pieces are entirely independent. Both will always need to reference the same version of DevForce assemblies, and also the same versions of your own application-specific assemblies, such as the domain model in this sample.
Web application deployment
The web application project hosting the DevForce EntityServer can be published like any other web application. See here for more information on deployment options from within Visual Studio.
Be sure that the global.asax and web.config files are included in the deployment, along with all referenced assemblies - both DevForce and application specific. For more information on DevForce-specific requirements, see the Deploy to IIS topic. This topic also includes discussions of database connection strings - which may need to be modified - and how to enable logging.
Client app deployment
Once you have a URL for the deployed web application, you need to ensure that your client application is using it.
The catch with DevForce is that we break out the pieces of your URL into separate properties on the objectServer element:
- remoteBaseURL: The protocol and machine name (or IP address) used to form the full URL
- serverPort: The port on which the web server is listening
- serviceName: Usually consists of both the ASP.NET application name and the service file name "EntityService.svc"
For example, if the web app is deployed to an Azure website with URL "https://myapp.azurewebsites.net" the objectServer properties would be:
| XML | <objectServer remoteBaseURL="https://myapp.azurewebsites.net" serverPort="443" serviceName="EntityService.svc" > |
If deployed as an application or virtual directory to IIS with the URL "http://myserver/myapp" the objectServer properties would be:
| XML | <objectServer remoteBaseURL="http://myserver" serverPort="80" serviceName="myapp/EntityService.svc" > |
More information on deploying the client app is available here.