
General Actions:


DevForce Resource Center » Samples » Security code samples » Code sample: Secure infrastructure (Silverlight)
Last modified on September 20, 2012 11:14
Contents
This solution demonstrates how to setup a typical secure web infrastructure using ASP.NET authentication.
- Platform: Silverlight
- Language: C#, VB
- Download: Secure infrastructure (Silverlight)
Problem
You'd like to create a secure architecture for your Silverlight application.
Solution
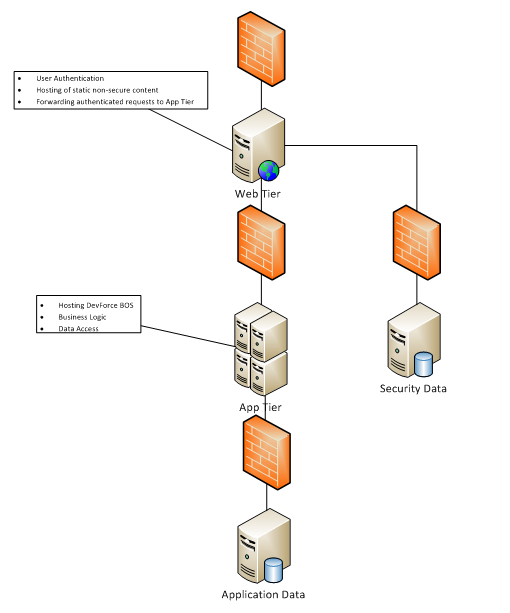
This solution demonstrates how to setup a typical secure web infrastructure using ASP.NET authentication. It utilizes the standard SQL ASP.NET providers to store user credentials in a database. This sample builds on the Silverlight Quickie Application.
This sample facilitates the following secure architecture.
Setup
You need a SQL server with the NorthwindIB database. In addition the aspnetdb database needs to be created. This standard database stores user membership, profile and role information.
In addition, the web tier requires the IIS Application Request Routing 2.0 Extension to be installed.
See the Prerequisites below for more information.
How to create Aspnetdb database?
You can use the aspnet_regsql command to create the aspnetdb database. This command executes the default scripts to create the default database for asp.net web applications.
Steps to create aspnetdb database using aspnet_regsql command:
- Open the Visual Studio 2010 command prompt from Start --> Microsoft Visual Studio 2010 --> Visual Studio Tools --> Visual Studio Command Prompt (2010)
- Type aspnet_regsql and press enter key
- This will open the ASP.Net SQL Server Setup wizard. Follow the wizard to create the database
Build the solution
- Open the Secure Infrastructure solution in Visual Studio
- Locate the QuickieWeb project and open its web.config file.
- Modify the connection strings for the NorthwindIB and aspnetdb databases if necessary. By default it looks for it on the localhost.
- Locate the WebTier project and open its web.config file.
- Modify the ApplicationServices connectionString for the aspnetdb database. You may have to first create a SQL login so that the WebTier can login.
- Locate the system.webServer section and modify the server name in the forwarding URL. This is the server that’s going to run your app tier.
- Build the solution.
Deploying the Web Tier
- Open the solution directory in Windows Explorer.
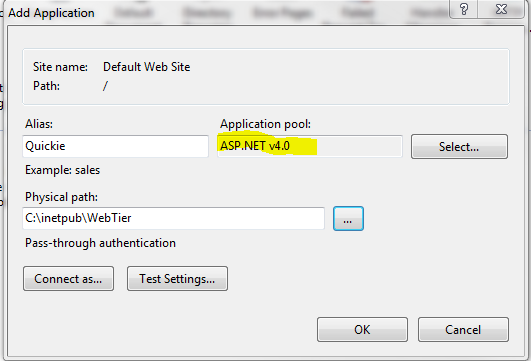
- Copy the entire WebTier folder into C:\Inetpub on the machine that you selected for your Web Tier.
- Launch the IIS Manager.
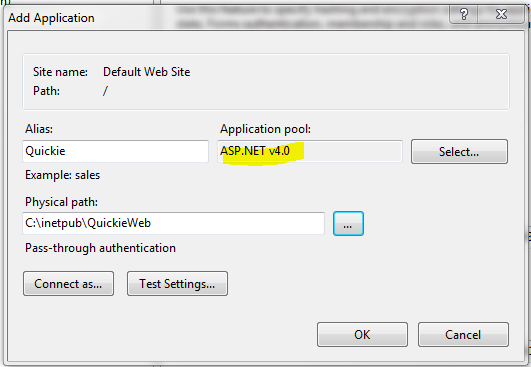
- Create a new Application and name it Quickie. Point the physical path to the WebTier folder. (Be sure to specify ASP.NET v4.0 for the Application pool)
Additional web tier configuration
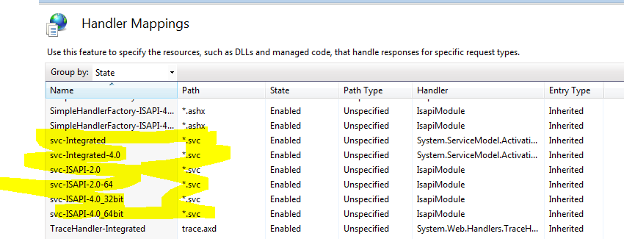
- Select the newly created Quickie Application and open Handler Mappings on the right side.
- Remove all the mappings for *.svc. If you forget this step or if they get readded later, the web tier is going to attempt to start the BOS web services and fail. We don’t want the web server to run any web services.
Machine Key
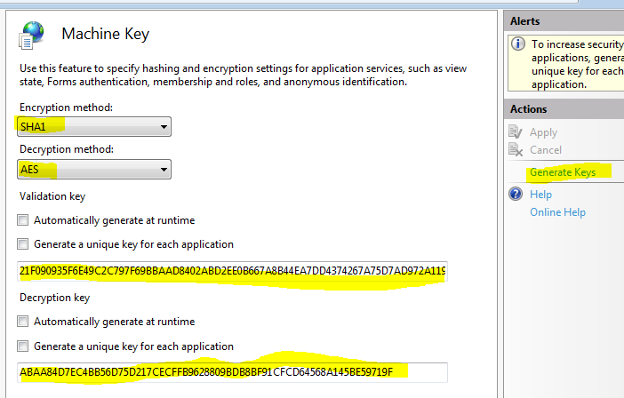
In order for both the web tier and app tier to able to decrypt the security token cookie, the keys used for encryption and decryption must be identical on all servers.
- Select the Quickie Application
- Open the Machine Key feature on the left side
- Manually generate the keys using the Generate Keys link on the very right. Saves these keys somewhere as you’ll have to enter them on the app tier server later on.
Deploying the App Tier
- Open the solution directory in Windows Explorer.
- Copy the entire QuickieWeb folder into C:\Inetpub on the machine that you selected for your App Tier.
- Launch the IIS Manager.
- Create a new Application and name it Quickie. Point the physical path to the QuickieWeb folder. (Be sure to specify ASP.NET v4.0 for the Application pool)
Machine Key
Enter the machine keys that you previously generated on the web tier.
- Select the Quickie Application
- Open the Machine Key feature on the left side
- Manually enter the keys from the web tier
Restart everything
For the new machine keys to take effect, you must restart IIS on both the app tier and web tier. Sometimes it is necessary to completely reboot the machine for the keys to take effect.
Test
At this point you should be able to hit the URL as follows: http://<your web tier server>/quickie/private/default.aspx.
The web tier should prompt you to login. You can register as a new user, which will log you in at the same time. If everything is successful, the Silverlight application should load and first pop up with a MessageBox showing your username. Click ok and the Datagrid should populate.
Instruct the EntityServer to use the current ASP.NET user
How does the Silverlight Application instruct the EntityServer to use the current ASP.NET user?
The Silverlight application instructs the EntityServer to use the current ASP.NET user as the principal by passing in null for the user credentials in the LoginAsync method.
var loginOp = mgr.LoginAsync(null); // Passing in null for credentials will pick up the current user
loginOp.Completed += (s, args) =>
{
MessageBox.Show("Current user is: " + mgr.Principal.Identity.Name);
var query = mgr.Customers;
var op = query.ExecuteAsync();
op.Completed += (s1, args1) =>
myCollectionViewSource.Source = args1.Results;
};
Prerequisites
- You need a SQL server with the NorthwindIB database. In addition the aspnetdb database needs to be created. This standard database stores the user credentials.
- In addition, the web tier requires the IIS Application Request Routing 2.0 Extension to be installed. The ARR extension can be downloaded and installed from the following location: Application Request Routing