Part 2: CUD - In Part 2 of this series we'll focus on "CUD" - Create, Update, and Delete. We'll take the application we started in Part 1, swap out the DataGrid for a DataForm editor, show how to add and delete entities and how to save to the database, work with a parent-child relationship and see both asynchronous and eager loading of dependent data, and finally watch it all work with some simple logging.
- Platform: Silverlight
- Language: C#, VB
- Download: Tour of DevForce Silverlight
Create, Update and Delete
Let's do something a little more interesting now. It would be nice if we could add, delete, and edit these employee records.
Let's go back to MainPage.xaml. We're going to replace the DataGrid with another control from the Toolkit called a DataForm. The DataForm is a very useful control for the rapid development of a data-centric application.
We'll add this control manually, rather than using the visual designer.
First, right-click on the SimpleSteps project and select Add Reference….
On the .NET tab, select the component named System.Windows.Controls.Data.DataForm.Toolkit and click OK.
Inside the XAML pane for MainPage.xaml, replace the <sdk:DataGrid /> element with
| XAML | <df:DataForm ItemsSource="{Binding Employees}" /> |
We also need to add a rather lengthy namespace alias to the root element in our XAML:
| XAML | xmlns:df="clr-namespace:System.Windows.Controls;assembly=System.Windows.Controls.Data.DataForm.Toolkit" |
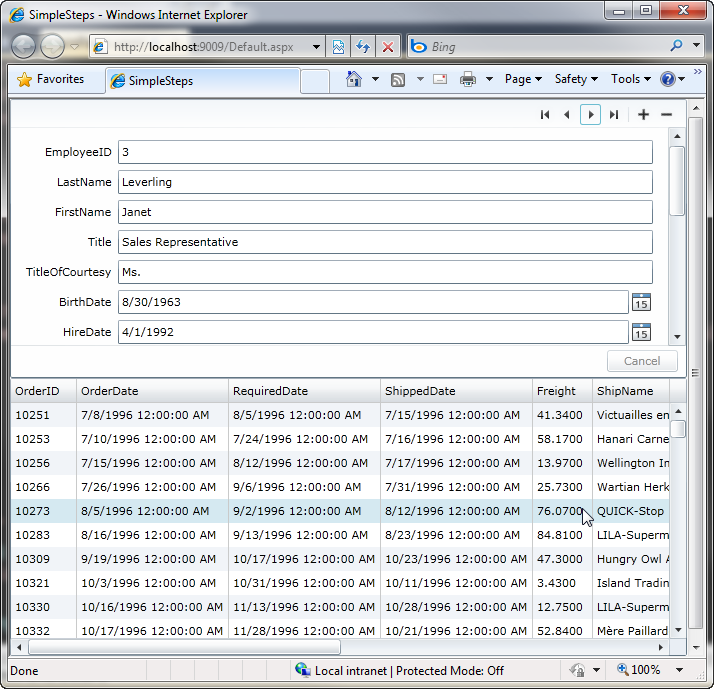
If you run the application now, you'll see a mostly empty screen. However, there are a handful of controls in the upper right corner that allow you to navigate the result set. Click the “Next” button, as shown at right, to navigate to the first Employee. After navigating to a record, you'll see that the data form automatically generates fields and labels for us.
Adding and deleting records
The plus and minus buttons allow us to add and delete records. Well, almost…
The data form is bound to the Employees property of our view model. When we use the data form to add a new record or to delete a record, it is merely affecting to our view model. The changes are not propagated to the database.
In fact, no changes that we make through the data form are being persisted to the database yet! We need to let the EntityManager know when the data form has changed something.
We can handle the data form's EditEnded event in the code behind for MainPage.xaml. However, the code-behind doesn't know anything about the EntityManager. We would prefer for MainPage.xaml to talk only to our view model and to hide as much of the implementation details as is reasonable. Let's add a method to our view model that will tell the EntityManager to save any changes back to the database.
Open MainPageViewModel.cs.
First, we need to promote our EntityManager from a local variable in the constructor to being a field on the class:
| C# | private NorthwindIBEntities _mgr; async void AsyncMainPageViewModel() { Employees = new ObservableCollection<Employee>(); _mgr = new NorthwindIBEntities(); ... } |
| VB | Private _mgr As NorthwindIBEntities Async Sub AsyncMainPageViewModel() Employees = New ObservableCollection(Of Employee)() _mgr = New NorthwindIBEntities() ... End Sub |
and now we can add the following:
| C# | public void Save() { _mgr.SaveChangesAsync(); } |
| VB | Public Sub Save() _mgr.SaveChangesAsync() End Sub |
This tells the EntityManager to save any changes that we've made. Notice that it is asynchronous as well.
We'd like to call Save() on our view model whenever the data form has finished editing an employee. Let's go back to the code-behind for MainPage.xaml and add the following:
| C# | private void DataForm_EditEnded(object sender, DataFormEditEndedEventArgs e) { var vm = (MainPageViewModel) DataContext; vm.Save(); } |
| VB | Private Sub DataForm_EditEnded(ByVal sender As Object, _ ByVal e As DataFormEditEndedEventArgs) Dim vm = DirectCast(DataContext, MainPageViewModel) vm.Save() End Sub |
We can wire this handler to the data form by adding this attribute to <df:DataForm /> in the XAML:
| XAML | EditEnded="DataForm_EditEnded" |
Now, any edits we make to employees will be persisted back to the database. However, we still need to handle adding and deleting employees.
Since the data form is adding and removing employees from the Employees property of our view model, we can take advantage of the fact that the collection raises events when it is changed.
On the line after we initialize Employees in the constructor for MainPageViewModel, add:
| C# | Employees.CollectionChanged += Employees_CollectionChanged; |
| VB | AddHandler Employees.CollectionChanged, AddressOf Employees_CollectionChanged |
Add these using statements if they are not present:
| C# | using System.Collections.Specialized; using System.Linq; using System.Collections.Generic; |
| VB | Imports System.Collections.Specialized Imports System.Linq Imports System.Collections.Generic |
Then add the following code for handling the event:
| C# | private void Employees_CollectionChanged(object sender, NotifyCollectionChangedEventArgs e){ switch (e.Action) { case NotifyCollectionChangedAction.Add: Add(e.NewItems.Cast<Employee>()); break; case NotifyCollectionChangedAction.Remove: Delete(e.OldItems.Cast<Employee>()); break; } } private void Add(IEnumerable<Employee> employees) { employees.ForEach(_mgr.AddEntity); } private void Delete(IEnumerable<Employee> employees) { employees.ForEach(employee => employee.EntityAspect.Delete()); Save(); } |
| VB | Private Sub Employees_CollectionChanged(ByVal sender As Object, _ ByVal e As NotifyCollectionChangedEventArgs) Select Case e.Action Case NotifyCollectionChangedAction.Add Add(e.NewItems.Cast(Of Employee)()) Exit Select Case NotifyCollectionChangedAction.Remove Delete(e.OldItems.Cast(Of Employee)()) Exit Select End Select End Sub Private Sub Add(ByVal employees As IEnumerable(Of Employee)) employees.ForEach(Sub(emp) _mgr.AddEntity(emp)) End Sub Private Sub Delete(ByVal employees As IEnumerable(Of Employee)) employees.ForEach(Sub(emp) emp.EntityAspect.Delete()) Save() End Sub |
Let's examine what we just added.
We can tell from the Action property on the event args if items are being added or removed. The event args also provide us with two collections: NewItems is a list of what was just added to the collection and OldItems is a list of the ones that were just removed. Neither list is strongly typed, so we have to explicitly cast them.
In order to make the logic easier to follow, we created the two supporting methods, Add and Delete, which call corresponding DevForce methods.
Add() iterates over the employees, passing them one at a time to AddEntity() on the EntityManager. The next time SaveChangesAsync() is called, these new employees will be inserted into the database.
Likewise, Delete() also iterates over the employees. However, we don't call a method on the EntityManager and pass in each employee. Instead, we call Delete() on the EntityAspect of each employee.
The EntityAspect property encapsulates most of the non-business properties and methods needed on an entity. Its entire reason for being is to remove clutter from the logical and Intellisense listings of the Entity itself. Thus, on an Employee, you see business properties like Address, BirthDate, etc., and a handful of other properties, methods, and events for very standard operations (like GetType(), ToString(), and so forth). Members encapsulated under EntityAspect include things less regularly used, or relating to data access (rather than business) concerns.
There are few things worth noting about this code. First, even though our method deals with collections of items, the data form control will only ever add or remove one employee at a time. Second, an employee is put under the EntityManager’s control (via the _mgr.AddEntity operation) as soon as we click the “plus” button on the data form. This means the Entity Manager is aware of the new employee before we have edited any of its data. The new employee is also immediately shown in the data form control, and consequently the EditEnded logic we added earlier will handle the saving of the new employee. Removing an employee, on the other hand, does not raise the EditEnded event, and that is why we explicitly call Save() inside our Delete() method.
Master-detail
Now that we've worked out the basic functionality. Let's explore how to load and display "master-detail" or "parent-child" data. Here we want to look at the Orders for each Employee.
Load child data asynchronously on demand
Every employee has a set of orders associated with them. We can access these orders using the navigation property called Orders. Let's say that we want to display these orders in a data grid. First, let’s add a data grid back to MainPage.xaml. We'll need to modify the layout to accommodate for this. We'll place the data form on the top and the data grid on the bottom.
Open MainPage.xaml and in the XAML pane modify the Grid named LayoutRoot so that it looks like this:
| XAML | <Grid x:Name="LayoutRoot" Background="White"> <Grid.RowDefinitions> <RowDefinition /> <RowDefinition /> </Grid.RowDefinitions> <df:DataForm x:Name="EmployeeForm" ItemsSource="{Binding Employees}" EditEnded="DataForm_EditEnded" /> <sdk:DataGrid ItemsSource="{Binding ElementName=EmployeeForm, Path=CurrentItem.Orders}" Grid.Row="1" /> </Grid> |
This is similar to the data grid we added earlier. However, instead of binding to the Employees property on the data context, we are creating a binding between two elements. Notice, that we have given the data form a name, EmployeeForm, and that we are referencing that in the binding. The data form control has a property called CurrentItem and its value will be the currently selected employee. Since we know that the CurrentItem on our data form will always return an instance of type Employee, we specify the Orders property as the source for the data grid.
Run the application, and navigate through a couple of employee records.

The data grid is populated with orders and we didn't have to write any additional code!
Notice that DevForce will initiate the fetch of an Employee’s orders automatically when the Employee’s Orders navigation property is invoked. However, as with all data retrieval in Silverlight, this is an asynchronous operation. If you were to invoke someEmployee.Orders in code, and you had not preloaded the targeted Orders into the local cache, you would not be able to depend upon those Orders being available to the next code statement. In the data binding scenario we’re working with here, however, everything works out quite nicely. When the requested Orders arrive on the client machine, the collection returned by CurrentItem.Orders notifies the DataGrid to which it is bound, and the data grid responds automatically by refreshing itself to display the newly received data.
CurrentItem.Orders refers to a different set of Orders for each Employee. Therefore, each time we navigate to a different Employee on our DataForm, DevForce must retrieve the appropriate set of Orders. The first time this retrieval takes place, the Orders must be obtained from the database. Because of that trip out to the database, you will notice a slight delay when navigating to a different employee before you see that Employee’s Orders in the data grid. However, if you move backward to an Employee previously viewed, you will see quick response, because once DevForce has retrieved the Orders into the local cache, it remembers that fact and subsequently retrieves them from there, with great speed.
Eager loading of child data
In many scenarios a developer can predict with fair accuracy when the user is going to need certain collections of data. (For example, in our application, it’s easy to figure out that a user viewing our Employee form is going to need the Orders associated with the various Employees.) In such a circumstance, it often makes sense to load the data for which the need is anticipated up front, in a single batch, rather than a little bit at a time. This is particularly true when displaying a data grid whose rows incorporate data from related entities. In that circumstance, for each row displayed, additional trips to the server to fetch the related entities will be incurred unless the related data is pre-loaded.
Naturally such a pre-loading operation introduces some up-front delay while the data is being retrieved, but that delay is usually very small in comparison to the total delays that would otherwise occur while retrieving the data in small batches. Even more importantly, pre-loading the data ensures extremely crisp performance for all subsequent operations which use that data, since they can obtain it from the local cache, almost instantaneously.
Pre-loading related data is very simple to do. To load the related Orders at the same time we load the Employees, we simply add to our query a call to the extension method Include.
| C# | var query = _mgr.Employees.Include("Orders"); var results = await query.ExecuteAsync(); |
| VB | Dim query = _mgr.Employees.Include("Orders") Dim results = Await query.ExecuteAsync() |
Now our form will take a small amount of extra time to load initially, but thereafter performs very snappily indeed.
Add the call to Include() to your copy of the view model, and notice the differences in both load time for the form and its subsequent performance. Do you like the trade-off?
Watch it work
Now let's add some simple logging to see what's happening as the query executes. We'll add another ObservableCollection named Log to hold the messages our code will generate.
Open MainPageViewModel.cs and add the following members:
| C# | public ObservableCollection<string> Log { get; private set; } // In the constructor, add: Log = new ObservableCollection<string>(); WriteToLog("Initializing View Model"); private void WriteToLog(string message) { Log.Insert(0, message); } |
| VB | Private privateLog As ObservableCollection(Of String) Public Property Log() As ObservableCollection(Of String) Get Return privateLog End Get Private Set(ByVal value As ObservableCollection(Of String)) privateLog = value End Set End Property ' In the constructor, add: Log = New ObservableCollection(Of String)() WriteToLog("Initializing View Model") Private Sub WriteToLog(ByVal message As String) Log.Insert(0, message) End Sub |
Now we have a simple logging mechanism in place, let's modify the XAML so that we can see it.
Let's place the log at the bottom of the screen, under the data grid. Open MainPage.xaml and add a new row in the RowDefinitions for LayoutRoot:
| XAML | <RowDefinition Height="Auto"/> |
We set the height to 'auto' so that the row will collapse to the smallest possible size. Next, below the data grid add:
| XAML | <ItemsControl ItemsSource="{Binding Log}" Height="200" Grid.Row="2" /> |
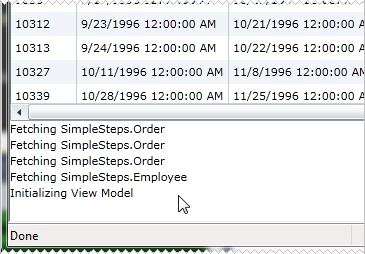
We can run the application now, and see our first log message.
What we are really interested in, however, is seeing what sort of data access is occurring. We can listen on some of the events raised as the EntityManager retrieves data, in this case we'll listen on the Fetching event, which occurs before the query is sent to the EntityServer.
Go back to MainPageViewModel and inside the constructor, immediately after we instantiate the EntityManager, add the following statement:
| C# | _mgr.Fetching += new EventHandler<EntityFetchingEventArgs>(_mgr_Fetching); |
| VB | AddHandler _mgr.Fetching, New EventHandler(Of EntityFetchingEventArgs) _ (AddressOf _mgr_Fetching) |
Tip: you can get Visual Studio to complete the right-hand-side of the above statement by pressing the TAB key after typing the “+=”. A second press of TAB directs Visual Studio to write a stub version of the event handler itself:
| C# | void _mgr_Fetching(object sender, EntityFetchingEventArgs e) { throw new NotImplementedException(); } |
| VB | Private Sub _mgr_Fetching(ByVal sender As Object, _ ByVal e As EntityFetchingEventArgs) Throw New NotImplementedException() End Sub |
Complete the handler by making it look as follows:
| C# | void _mgr_Fetching(object sender, EntityFetchingEventArgs e) { WriteToLog("Fetching " + e.Query.ElementType); } |
| VB | Private Sub _mgr_Fetching(ByVal sender As Object, _ ByVal e As EntityFetchingEventArgs) WriteToLog("Fetching " & Convert.ToString(e.Query.ElementType) End Sub |
The event handler can also be wired in a single statement using lambda-expression syntax. This syntax is more compact, but also a bit more abstruse. It is quite handy when you are familiar with the method signature for the event handler:
| C# | _mgr.Fetching += (s,e) => WriteToLog("Fetching " + e.Query.ElementType); |
| VB | AddHandler _mgr.Fetching, Sub(s) WriteToLog("Fetching " + e.Query.ElementType)) |
Whenever Fetching is raised, we will now write out the entity type of the query to our log.

This concludes Part 2 of the tour of DevForce Silverlight.
Learn More
We've briefly covered a lot of topics here. Here are some links to what we've covered, and additional information we hope you find useful.
- EntityManager Overview
- CUD with entities
- Performing a save
- Entity internals
- Eager loading
- The query life cycle
- More Silverlight resources
Prerequisites
The user interface for the application built during this tour uses a DataForm component supplied by the Silverlight 5 Toolkit (different from the Silverlight 5 Tools!). You can download the Toolkit here:

