
General Actions:


DevForce Resource Center » Getting started » Silverlight tour » Tour of DevForce Silverlight - Part 3
Last modified on November 06, 2012 13:10
Part 3: Extend the entity and show when DevForce is busy - In Part 3 of this series we'll refine the work we did in Part 2: we'll extend the Employee class with custom business logic and add a busy indicator to show when the application is busy.
- Platform: Silverlight
- Language: C#, VB
- Download: Tour of DevForce Silverlight
Track the CurrentItem
Perhaps when we are fetching orders, we'd also like to know the id of the associated employee.
First, let's add a new member to our view model:
| C# | public Employee CurrentEmployee { get; set; } |
| VB | Public Property CurrentEmployee() As Employee |
We'll use this to keep track of which employee we are currently viewing the details for.
Next, we'll create an overload of our WriteToLog method that specifically handles queries.
| C# | private void WriteToLog(IEntityQuery query) { var returnType = query.ElementType; var message = (returnType == typeof(Order)) ? "Fetching Orders from Employee " + CurrentEmployee.EmployeeID : "Fetching " + returnType; WriteToLog(message); } |
| VB | Private Sub WriteToLog(ByVal query As IEntityQuery) Dim returnType = query.ElementType Dim message = "" If (returnType.Equals(GetType(Order))) Then message = "Fetching Orders from Employee " + CurrentEmployee.EmployeeID Else message = "Fetching " & Convert.ToString(query.ElementType) End If WriteToLog(message) End Sub |
(Recall that the first overload of WriteToLog() that we wrote, shown below, simply takes a string parameter.)
| C# | private void WriteToLog(string message) { Log.Insert(0, message); } |
| VB | Private Sub WriteToLog(ByVal message As String) Log.Insert(0, message) End Sub |
We'll also modify the handler for the Fetching event to use the new overload:
| C# | _mgr.Fetching += (s,e)=> WriteToLog(e.Query); |
| VB | AddHandler _mgr.Fetching, Sub(s, e) WriteToLog(e.Query) |
Finally, we need to keep our new CurrentEmployee in sync with the view. We can easily do this using data binding.
Open MainPage.xaml and add the following attribute to the data form:
| XAML | CurrentItem="{Binding CurrentEmployee, Mode=TwoWay}" |
We can run the application now and see the results of our improved logging.
Extend entities
It would be a nice improvement to show the full name of the employee in the log and not just the id. Currently, we have a FirstName and a LastName, but no FullName property. We could simply concatenate the names when we create the log message, but this is an excellent excuse to show how easily we can extend our entities with custom properties and logic.
Right-click on the SimpleStepsWeb project, and select Add | Class and name it Employee. Modify the new class so that it matches the following:
| C# | public partial class Employee { public string FullName { get { return FirstName + " " + LastName; } } } |
| VB | Partial Public Class Employee Public ReadOnly Property FullName() As String Get Return FirstName & " " & LastName End Get End Property End Class |
Notice that we are using the partial keyword. This is because DevForce has already created an Employee class for us and we want to extend that existing class.
Note that the fully qualified name of the class must be the same in all of the files that constitute the partial class. In our case, the fully qualified name is SimpleSteps.Employee.
There is one additional step in order to make our extension of the Employee class visible the Silverlight project. Right-click on the Shared Code folder in SimpleSteps and select Add | Existing Item….
Locate the Employee.cs file that we just created in the SimpleStepsWeb folder. While it is selected in the dialog, click the little drop down on the right side of the Add button and choose Add As Link.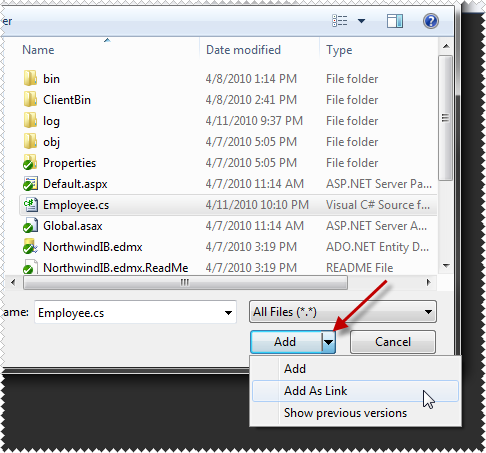
Now Employee.cs is linked with the Silverlight project, just like NorthwindIB.IB.Designer.cs. Before we can compile the class in Silverlight though, we'll also need to remove:
| C# | using System.Web; |
| VB | imports System.Web |
Now we can modify our WriteToLog method in MainPageViewModel to include the employee's full name:
| C# | var message = (returnType == typeof(Order)) ? "Fetching Orders from Employee " + CurrentEmployee.FullName : "Fetching " + returnType; |
| VB | If (returnType.Equals(GetType(Order))) Then message = "Fetching Orders from Employee " + CurrentEmployee.FullName Else message = "Fetching " & Convert.ToString(query.ElementType) End If |
Show busy
We've already pointed out the asynchronous nature of queries against the database from Silverlight. While the EntityManager is off fetching data we want to take control of the screen to tell the user the application is busy.
We'll make use of the BusyIndicator control from the Silverlight Toolkit to do this. Right-click on SimpleSteps and select Add Reference… and select System.Windows.Controls.Toolkit and click Ok.
Open MainPage.xaml and on the root element add another namespace alias:
| XAML | xmlns:tk="clr-namespace:System.Windows.Controls;assembly=System.Windows.Controls.Toolkit" |
We're going to add the busy indicator as the child element of the UserControl. The current child, LayoutRoot, will become the child of the busy indicator. The new structure of the XAML file will look like this:
| XAML | <UserControl> <tk:BusyIndicator IsBusy="{Binding IsBusy}"> <tk:BusyIndicator.BusyContent> <TextBlock Text="LOADING..." /> </tk:BusyIndicator.BusyContent> <Grid x:Name="LayoutRoot"> <!-- many attributes and elements removed for clarity --> </Grid> </tk:BusyIndicator> </UserControl> |
When the IsBusy property is set to true on the busy indicator, it will overlay the contents of BusyContent, along with an animation, over the regular content.
We've already added a binding to the busy indicator, but there is no corresponding IsBusy property on the view model. Let's add that now. In doing so, we'll also need to implement the INotifyPropertyChanged interface on our view model. This interface allows the data binding system in Silverlight to respond appropriately when the values of bound properties are changed.
Open MainPageViewModel and add a new using statement:
| C# | using System.ComponentModel; |
| VB | Imports System.ComponentModel |
Modify the first line of the class:
| C# | public class MainPageViewModel : INotifyPropertyChanged |
| VB | Public Class MainPageViewModel Implements INotifyPropertyChanged |
Then add these members to the class:
| C# | public event PropertyChangedEventHandler PropertyChanged = delegate { }; private void RaisePropertyChanged(string property) { PropertyChanged(this, new PropertyChangedEventArgs(property)); } private bool _isBusy; public bool IsBusy { get { return _isBusy; } set { _isBusy = value; RaisePropertyChanged("IsBusy"); } } |
| VB | Public Event PropertyChanged As PropertyChangedEventHandler Implements INotifyPropertyChanged.PropertyChanged Private Sub RaisePropertyChanged(ByVal property1 As String) RaiseEvent PropertyChanged(Me, New PropertyChangedEventArgs(property1)) End Sub Private _isBusy As Boolean Public Property IsBusy() As Boolean Get Return _isBusy End Get Set(ByVal value As Boolean) _isBusy = value RaisePropertyChanged("IsBusy") End Set End Property |
We want to set IsBusy to true whenever we initiate a query and then set it to false whenever the results are returned. Inside the constructor, let's modify our event handlers:
| C# | _mgr.Fetching += (s, e) => { IsBusy = true; WriteToLog(e.Query); }; _mgr.Queried += (s, e) => { IsBusy = false; WriteToLog("Query returned " + e.Results.Cast<object>().Count()); }; |
| VB | AddHandler _mgr.Fetching, Sub(s, e) IsBusy = True WriteToLog(e.Query) End Sub AddHandler _mgr.Queried, Sub(s, e) IsBusy = False WriteToLog("Query returned " & e.Results.Cast(Of Object)().Count().ToString()) End Sub |
Run the application now and navigate through a couple of employees. You'll see the busy indicator in action.
Simple validation
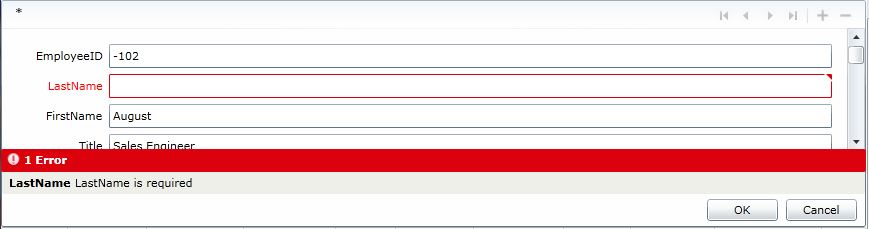
One more thing to note, and not covered in the video, is the basic validation you get out of the box with DevForce. In generating your entity model, DevForce examined the schema for basic rules, such as a field not allowing nulls or having a maximum length. DevForce in turn generated validation attributes on these properties; so for example the LastName here is both required, and has a maximum length of 30 characters.
We can see this in action if we add a new employee using the DataForm and leave the LastName blank:
Learn More
We've briefly covered a lot of topics here. Here are some links to what we've covered, and additional information we hope you find useful.
- EntityManager Overview
- The query life cycle
- Adding business logic
- Asynchronous queries and saves
- DevForce entities and the UI
- Validation overview
- More Silverlight resources
Prerequisites
The user interface for the application built during this tour uses a DataForm component supplied by the Silverlight 5 Toolkit (different from the Silverlight 5 Tools!). You can download the Toolkit here:
http://silverlight.codeplex.com/