
General Actions:


Last modified on October 16, 2012 14:07
Part 1: From "File New" to a working DevForce application - In Part 1 of this series we'll see how quickly you can get started writing a WPF application using DevForce. In this tutorial we'll create a new application, add an entity model, and load query results into a grid.
- Platform: WPF
- Language: C#, VB
- Download: Tour of DevForce WPF
Getting started
Let's begin by creating a new project. We'll be using Visual Studio 2012 and targeting WPF.
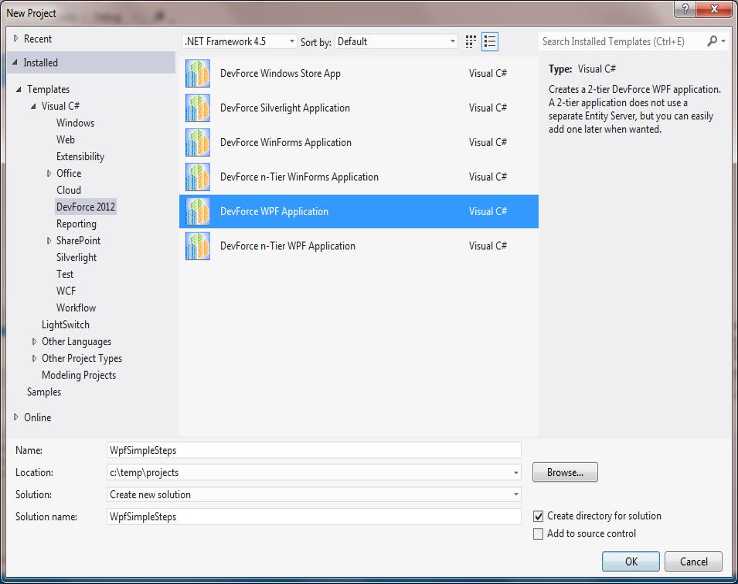
First, select File, New, Project from the main menu.
You'll notice that several project templates are available under DevForce 2012. Select DevForce WPF Application, name your project "WpfSimpleSteps", and click OK.
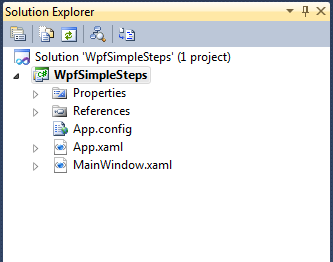
The template creates one project for us.
The standard DevForce WPF template creates a 2-tier configuration. A 2-tier application does not use an application server to provide database access, but instead communicates directly with the database.
Create an entity model
In this tutorial, we are going to use the NorthwindIB database that is provided with DevForce samples. You can find the database here.
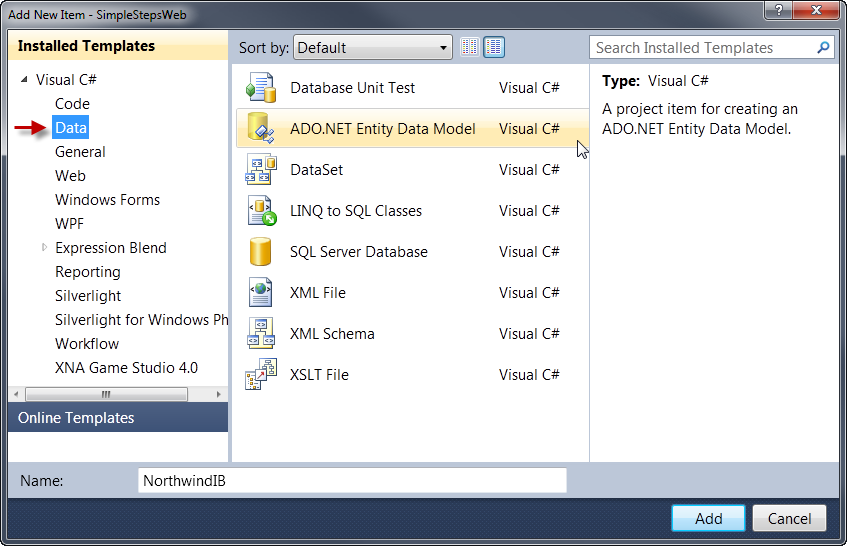
We'll use an Entity Framework Entity Data Model for accessing data. Right-click on the WpfSimpleSteps project and select Add | New Item….
In the Add New Item dialog, you will find the ADO.NET Entity Data Model under Data. We'll name ours NorthwindIB and click Add. You can also locate the template quickly by simply typing "ADO" into the Search Installed Templates field in the upper right of the dialog.
Next we'll select Generate from database and then click Next.
You'll need to create a connection to NothwindIB that is specific to your environment. Click New Connection to set one up.
Note that, by default, the wizard will save your entity connection settings under the name “NorthwindIBEntities”. This will also become the name of the EntityManager you will use in your application to retrieve and cache entities. Accept this default name, and click Next to continue
The Entity Data Model Wizard wants to know which objects to include in the model. For this tutorial we’ll just create entities backed by Tables. Expand the Tables node and select the following tables, leaving the others unchecked:
- Customer
- Employee
- Order
- OrderDetail
- Product
- Supplier
We'll leave the rest of the settings at their default values and click Finish.
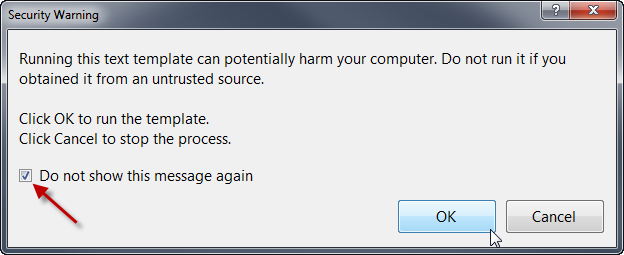
You might receive a Security Warning at this point. Don't worry. DevForce is using Visual Studio's templating system to generate code based upon the Entity Data Model we just created. We recommend checking Do not show this message again and then clicking OK.
After the template completes the visual designer opens and we can explore the Entity Data Model or “EDM”. We'll come back to it in a moment.
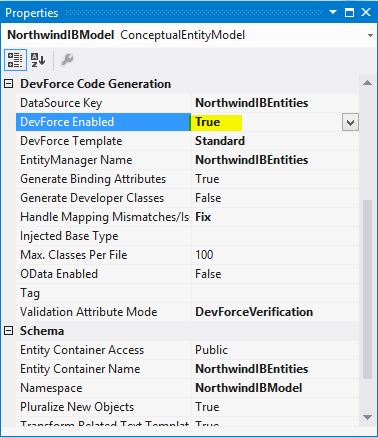
You must now "enable" DevForce for this model in order for DevForce to generate the entity model code. See Enable DevForce for more information.
With DevForce enabled, the DevForce T4 template that guides the generation of our business model is added to WpfSimpleSteps. Notice that its name matches the name of our EDM and has the file extension "tt". If you expand the template node, you'll see a file named NorthwindIB.IB.Designer.cs. This is the code that was generated by DevForce using the template.
Let's go back to the visual designer for our EDM. The diagram represents a conceptual view of the model entities and their associations. This view was generated based on the schema of the NorthwindIB database. DevForce uses this conceptual model to generate the corresponding .NET entity classes.
Entity Framework does a fairly good job of naming these items to meet our expectations. If we examine the Navigation Properties on the Employee class, we see that it created a property, Orders, that returns a collection of Order instances.
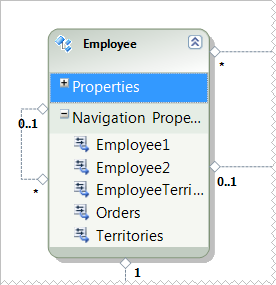
 However, in some cases the EDM designer really didn’t know what to do. Notice the properties on Employee that are named Employee1 and Employee2. One of the properties represents the manager for a given employee and the other represents a collection of the employee's direct reports. If we right-click on Employee1 and select Properties, we can examine the details for the Employee1 property.
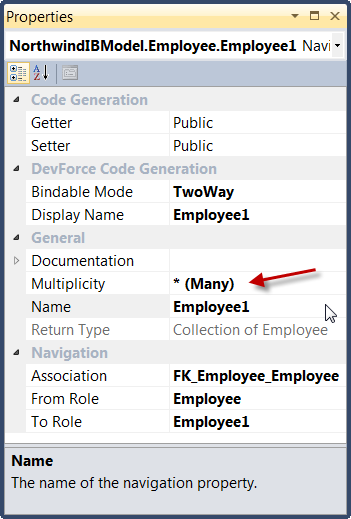
(Note that we've also selected the Categorized icon ![]() on the toolbar in the Properties panel so that you can see how the properties are grouped.)
on the toolbar in the Properties panel so that you can see how the properties are grouped.)
(Notice that the Multiplicity for Employee1 is "* (Many)" and that the Return Type is "Collection of Employee". This lets us know that this property returns the collection of direct reports rather than the single Employee representing the current Employee’s manager. Since we want our model to be both clear and rich in meaning, let's rename this property.
We'll change the value of Name to "DirectReports". When we do so, the value of Display Name will change as well.
Next, we select the property Employee2 on the Employee class. By examining its details, we confirm that it represents the employee's manager. We'll change its Name to "Manager".
Display Name is not a property native to Entity Framework. It’s actually an attribute that DevForce adds to the EDM. DevForce extends both the Entity Framework EDM and the Entity Framework Visual Designer with its own XML attributes and properties. All of the DevForce extensions are grouped under the “DevForce Code Generation” category.
We now have a functional business model, and we can turn our attention to the user interface.
Run a query
Let's say that we want a form in our application for viewing the details of employees.
We'll begin by creating a new class that will be a logical representation of our form. This class will be our view model. We'll use the powerful data binding system in WPF to bind an instance of the view model to the currently existing MainWindow.xaml. The XAML file and its associated code-behind are known as the view. This approach is very popular in WPF development and is part of the design pattern known as Model-View-ViewModel.
Right-click on the WPF project, WpfSimpleSteps, and select Add | Class ….
Name the new class MainWindowViewModel and then click Add. (We're choosing this name to remind us that it is an abstraction of the view MainWindow.xaml.)
We'll need a collection of all the employees. So let's add
| C# | public ObservableCollection<Employee> Employees { get; private set; } |
| VB | Public Property Employees() As ObservableCollection(Of Employee) Get Return privateEmployees End Get Private Set(ByVal value As ObservableCollection(Of Employee)) privateEmployees = value End Set End Property |
and we'll need to add a using or Imports statement also:
| C# | using System.Collections.ObjectModel; |
| VB | Imports System.Collections.ObjectModel |
ObservableCollection<T> is a special type that raises an event whenever items are added or removed. This is known as change notification and is an important part of WPF's data binding system.
Employee is one of the entity classes that were generated by DevForce.
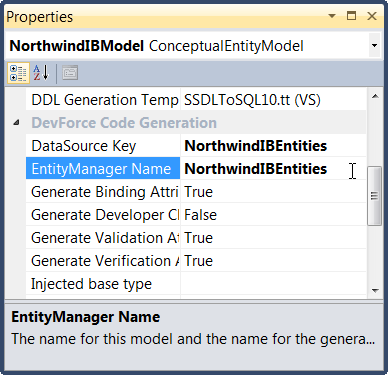
Now, we want to populate our new collection with data. We gain access to the data by means of a class known as the EntityManager. DevForce generates a special EntityManager for us that is extended to support our specific database. Let's jump back to the visual designer for NorthwindIB.edmx for a moment. If we click somewhere on the design surface, in empty space and not on an entity, then we'll see the details for the EDM as a whole in the Properties panel.
We're interested in the property EntityManager Name. This is the name of our model-specific class.
Let's add a constructor to MainWindowViewModel and create an instance of our EntityManager. We'll also initialize the Employees collection.
| C# | public MainWindowViewModel() { Employees = new ObservableCollection<Employee>(); var mgr = new NorthwindIBEntities(); } |
| VB | Public Sub New() Employees = New ObservableCollection(Of Employee)() Dim mgr = New NorthwindIBEntities() End Sub |
If you examine the properties of the NorthwindIBEntities manager, you will discover that many of them correspond to the entities in our EDM. In fact, we see a property named Employees that returns the type EntityQuery<Employee>. These properties are our "hooks" for querying the data in our database. For example, let’s say that we want all of the employees whose last name begins with 'B'. We could use LINQ to create the query:
| C# | var query = from employee in mgr.Employees where employee.LastName.StartsWith("B") select employee; |
| VB | Dim query = From employee In mgr.Employees Where employee.LastName.StartsWith("B") Select employee |
In our case, we want all of the employees in the database. We don't need to filter the set, so we can simply say:
| C# | var query = mgr.Employees; |
| VB | Dim query = mgr.Employees |
This abbreviated form is equivalent to:
| C# | var query = from employee in mgr.Employees select employee; |
| VB | Dim query = From employee In mgr.Employees Select employee |
We want to emphasize that the Employees property produces a query and not a collection of objects. In order to get results of the query, we need to execute it. Just defining the query does not actually cause the database to be hit.
In a WPF application, we have two options to execute a query. We can execute a query synchronously or asynchronously. In the synchronous case, the client will block until the data is available. This results in a frozen UI. In the asynchronous case, the client proceeds, while the server is retrieving the data and once the data is available the client can process the results.
In this example, we will use the asynchronous way of executing a query.
First, we'll need two more using or Imports statements:
| C# | using IdeaBlade.Core; using IdeaBlade.EntityModel; |
| VB | Imports IdeaBlade.Core Imports IdeaBlade.EntityModel |
and then we'll execute our query like this:
| C# | var results = await query.ExecuteAsync(); results.ForEach(Employees.Add); |
| VB | Dim results = Await query.ExecuteAsync() results.ForEach(Sub(emp) Employees.Add(emp)) |
Here we await the ExecuteAsync method, and then add the result, an IEnumerable<Employee>, to the ObservableCollection. See the topic on asynchronous queries for more information.
We are using the extension method ForEach() to iterate over the results and add them to the ObservableCollection<Employee> (Employees) in MainPageViewModel. The ForEach() “extension method” is a part of IdeaBlade.Core. It executes a given method once for each member in Results, and so we use it to call the Add() method on Employees.
The complete code for our view model now looks like this:
| C# | using IdeaBlade.Core; using IdeaBlade.EntityModel; namespace WpfSimpleSteps { class MainWindowViewModel { public ObservableCollection<Employee> Employees { get; private set; } public MainWindowViewModel() { AsyncMainWindowViewModel(); } async void AsyncMainWindowViewModel() { Employees = new ObservableCollection<Employee>(); var mgr = new NorthwindIBEntities(); var query = mgr.Employees; var results = await query.ExecuteAsync(); results.ForEach(Employees.Add); } } } |
| VB | Imports System.Text Imports System.Collections.ObjectModel Imports IdeaBlade.Core Imports IdeaBlade.EntityModel Namespace WpfSimpleSteps Friend Class MainWindowViewModel Private privateEmployees As ObservableCollection(Of Employee) Public Property Employees() As ObservableCollection(Of Employee) Get Return privateEmployees End Get Private Set(ByVal value As ObservableCollection(Of Employee)) privateEmployees = value End Set End Property Public Sub New() AsyncMainWindowViewModel() End Sub Async Sub AsyncMainWindowViewModel() Employees = New ObservableCollection(Of Employee)() Dim mgr = New NorthwindIBEntities() Dim query = mgr.Employees Dim results = Await query.ExecuteAsync() results.ForEach(Sub(emp) Employees.Add(emp)) End Sub End Class End Namespace |
Display the data
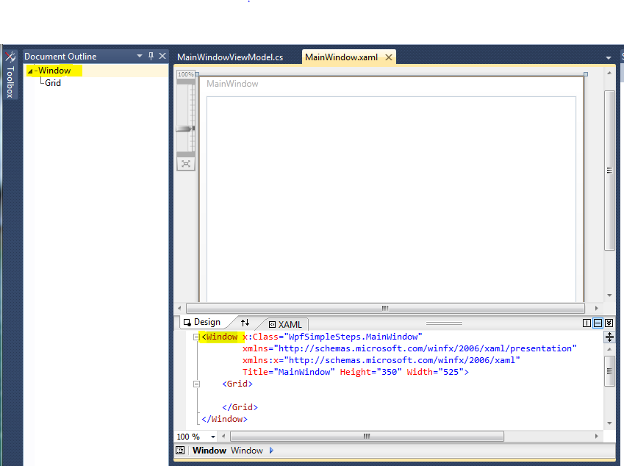
For this next step we're going to add a DataGrid to the form to display our query results. Let's open MainWindow.xaml.
If you look in the Document Outline panel (or even in the XAML pane), you will see that the root element is a Window.
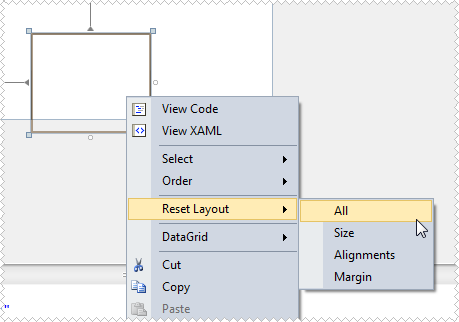
Next, locate the DataGrid control in the Toolbox and drag it anywhere on to the design surface. The initial placement, alignment, and margins of the data grid are not very useful. Right-click on the data grid and select Reset Layout | All.
If you examine the XAML, you'll see that the data grid is represented by the markup:
| XAML | <DataGrid AutoGenerateColumns="False" Name="dataGrid1" /> |
We want to use this control to view our employees. We have to make two changes to the XAML for the DataGrid:
- Change the value of its AutoGenerateColumns property to “True”; and
- Bind its ItemsSource to the Employees collection on our view model.
| XAML | <DataGrid AutoGenerateColumns="True" Name="dataGrid1" ItemsSource="{Binding Employees}" /> |
Ok, there's one more thing we need to do before we can run the application. We need to tell the view, MainWindow.xaml , about our view model, MainWindowViewModel.
Right-click on MainWindow.xaml and select View Code. We're going to create an instance of our view model and set it as the data context for MainWindow.xaml whenever it loads. The data context is what WPF uses to resolve data bindings. We've told WPF to bind the data grid to Employees, but WPF doesn't yet know what "Employees" means. We have to give it a context so that it can correctly interpret the binding.
Modify the constructor for MainWindow.xaml.cs to this:
| C# | public MainWindow() { InitializeComponent(); Loaded += delegate { DataContext = new MainWindowViewModel(); }; } |
| VB | Public Sub New() InitializeComponent() AddHandler Loaded, Sub() DataContext = New MainWindowViewModel() End Sub |
Now we are ready to run the application!
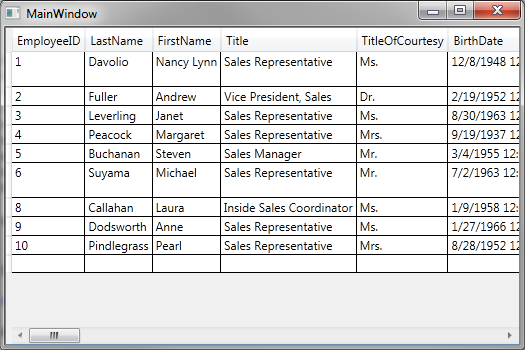
Notice that you'll see the empty grid display for just a second before the data is also displayed. This is because the WPF client is making an asynchronous call to query the data.
This concludes Part 1 of the tour of DevForce WPF.
Learn More
We've briefly covered a lot of topics here. Here are some links to what we've covered, and additional information we hope you find useful.
- Getting started with DevForce
- Creating a new DevForce application
- Understanding the Entity Data Model
- Code generation
- EntityManager Overview
- Writing a LINQ query
- More on related technologies
- WPF data binding
Prerequisites
The user interface for the application built during this tour uses a BusyIndicator component supplied by the Extended WPF Toolkit. You can download the assembly from:
http://wpftoolkit.codeplex.com/
After downloading the assembly, place it anywhere in your solution directory and add a reference to your project. Because the assembly is coming from the Web, you may have to unlock it in order for Visual Studio to be able to open it. Right-click on the assembly in Windows Explorer and choose Properties. If the file is locked you will be presented with an Unlock button at the bottom of the General tab. Click the Unlock button to unlock the file.