
General Actions:


DevForce Resource Center » Punch » Reference apps and tutorials » The Happy Hour Tutorial » Bare bones MVVM
Last modified on January 26, 2015 14:40
Contents
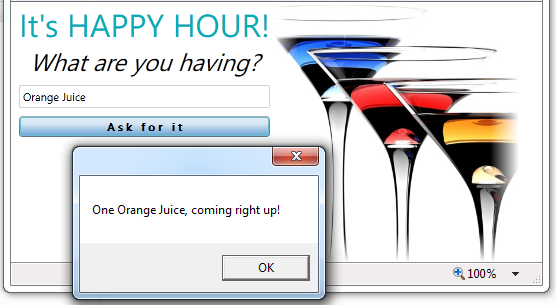
We begin with a simple application consisting of a single View that has no Punch support at all. Our application has a TextBox and a button. The user types the name of a cocktail in the TextBox, clicks the button, and a message window pops up that says, One [whatever-you-said], coming right up!
With our eye on the future, we soon will over-engineer this example by writing it in Model-View-ViewModel (MVVM) style. But let’s start with just a View class.
Beginnings
File | New | Project | Silverlight Application | “HappyHour”
1. Uncheck Host in a new Web site as we won’t need a server for quite a while.
2. The Silverlight Version must be 5.
3. Add a Views folder to the HappyHour project.
4. Drag MainPage.xaml into the Views folder.
In Punch, the MainPage is known as a "View". A real application will have a great number of views; we’re structuring this tutorial app to conform to our vision of the future.
5. Open MainPage.xaml in Design view with split panel (Design/XAML) showing both the design canvas and the XAML.
6. Rename the class, HappyHour.Views.MainPage.
| XAML | <UserControl x:Class="HappyHour.Views.MainPage" |
7. Insert the following within the <Grid>…</Grid> tags.
| XAML | <StackPanel Margin=“8,0,0,8”> <TextBlock Text="It's HAPPY HOUR!" FontSize="36" TextAlignment="Center"/> <TextBlock Text="What are you having?" FontSize="18"/> <TextBox x:Name="DrinkName" Margin="0,8,0,8" /> <Button x:Name="AskForIt" Content="Ask for it" Margin="0,0,0,4" /> </StackPanel> |
8. Double-click Button in the design canvas to generate a click handler. Visual Studio responds first by adding a Click attribute to the Button XAML:
| XAML | <Button ... Click="AskForIt_Click" ... /> |
9. Open MainPage.xaml.cs code-behind file and modify the click handler in the code-behind to be:
| C# | private void AskForIt_Click(object sender, RoutedEventArgs e) { MessageBox.Show( string.Format( "One {0}, coming right up!", DrinkName.Text)); // don't do this in real app } |
10. Update the namespace to HappyHour.Views.
11. Open App.xaml.cs
12. Update the RootVisual assignment to Views.MainPage
| C# | private void Application_Startup(object sender, StartupEventArgs e) { this.RootVisual = new Views.MainPage(); } |
Build and run [F5]
Enter a drink name in the text box – be careful … it is way too early for serious drinking – and press the button. The app responds:
Make it prettier
We’re not graphic designers but even we can add some style to liven this up.
1. Add | New Folder | “assets” …
This folder will hold a variety of “assets” to beautify your application. In a big application we’d have subfolders dedicated to different types of assets but for now we’ll keep it flat.
We’ll add three assets located in separate subdirectories under the top level, Happy Hour "Mixers" folder.
2. Do the following procedure three times:
a. Add | Existing Item
b. Browse up to HappyHour / Mixers
c. Pick the pertinent subdirectory (e.g., "styles")
d. Select the asset (e.g., "HappyHourStyles")
e. Select Add As Link in the Add button dropdown
The three assets are:
- HappyHourStyles - a ResourceDictionary of styles in the styles subdirectory.
- SegoeWP.ttf - a “True Type” Metro font in the fonts subdirectory.
- happyhour_logo.png - a colorful image in the images subdirectory.
3. Open App.xaml.
4. Add the style HappyHourStyles ResourceDictionary to our application-wide resources.
| XAML | <Application.Resources> <!-- Resources scoped at the Application level should be defined here. --> <ResourceDictionary> <ResourceDictionary.MergedDictionaries> <ResourceDictionary Source="assets/HappyHourStyles.xaml"/> </ResourceDictionary.MergedDictionaries> </ResourceDictionary> </Application.Resources> |
5. Return to MainPage.xaml.
6. Set d:DesignWidth="550" at the top of the XAML so we have some room.
We’re ready to spruce up the View. We make a two-column grid with the form on the left and an arresting image on the right. We add styles to the form elements.
The result is as follows (you can just paste it in … I know you will).
| XAML | <Grid x:Name="LayoutRoot" Background="White"> <Grid.ColumnDefinitions> <ColumnDefinition Width="Auto"/> <ColumnDefinition Width="Auto"/> </Grid.ColumnDefinitions> <StackPanel Margin=“8,0,0,8”> <TextBlock Text="It's HAPPY HOUR!" Style="{StaticResource TitleTextBlock}" /> <TextBlock Text="What are you having?" Style="{StaticResource QuestionTextBlock}" /> <TextBox x:Name="DrinkName" Margin="0,8,0,8" /> <Button x:Name="AskForIt" Content="Ask for it" Click="AskForIt_Click" Margin="0,0,0,4"/> </StackPanel> <Image Source="/HappyHour;component/assets/happyhour_logo.png" Grid.Column="1" /> </Grid> |
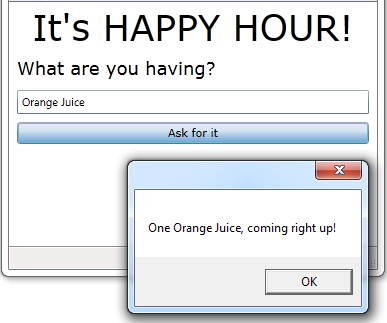
Build and run [F5]
Still too early to celebrate but we’re feeling the first stirrings of excitement.
Close all windows [Alt-W, L].
Add a MainPageViewModel
Most Silverlight and WPF application Views are supported by a ViewModel. We’ll write a bare-bones ViewModel without the aid of a supporting framework.
1. Add a ViewModels folder to the HappyHour project.
2. Add | New Item | Class | “MainPageViewModel”
3. Add a DrinkName property:
| C# | public string DrinkName { get; set; } |
4. Add an AskForIt method as follows:
| C# | public void AskForIt() { MessageBox.Show( string.Format(CultureInfo.CurrentCulture, "One {0}, coming right up!", DrinkName)); // don't do this in real app } |
You’ll have to add "using System.Globalization;" to access CultureInfo. It’s worth it to prepare your string formats for globalization.
5. Open MainPage.xaml and add a binding to the TextBox.
| XAML | <TextBox x:Name=“DrinkName” Margin="0,8,0,8" Text="{Binding DrinkName, Mode=TwoWay}" /> |
6. Open the MainPage.xaml.cs code-behind.
7. Add using HappyHour.ViewModels;
8. Revise the class implementation as follows:
| C# | public partial class MainPage : UserControl { private readonly MainPageViewModel _viewModel; public MainPage() { InitializeComponent(); DataContext =_viewModel = new MainPageViewModel(); } private void AskForIt_Click(object sender, RoutedEventArgs e) { _viewModel.AskForIt(); } } |
Observe:
- The View instantiates the ViewModel in the constructor.
- The constructor sets the View’s DataContext with the ViewModel so that the "DrinkName" TextBox binds to the ViewModel’s DrinkName property at runtime.
- The View records the ViewModel instance in a typed variable (_viewModel) for later reference.
- The "AskForIt_Click" method now re-routes its previous behavior to the ViewModel.
Build and run [F5]
Confirm that the application runs exactly as it did before.
Enable the Button Conditionally
Right now the button is always enabled even when the drink name TextBox is empty. Click the button and it just says One, coming right up!
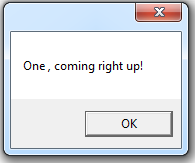
What is coming right up? We want the message to appear only when the app knows what to deliver. We will disable the button when the TextBox is empty and enable it when the TextBox has a value.
1. Return to MainPageViewModel and add the CanAskForIt guard property:
| C# | public bool CanAskForIt { get { return !String.IsNullOrWhiteSpace(DrinkName); } } |
2. Return to MainPage.xaml and modify the button so that its IsEnabled property is bound to the ViewModel’s CanAskForIt property.
| XAML | <Button x:Name="AskForIt" Content="Ask for it" Click="AskForIt_Click" IsEnabled="{Binding CanAskForIt}" Margin="0,0,0,4"/> |
3. Return to MainPageViewModel.
Now that the Button’s IsEnabled property is bound to the CanAskForIt property, the button will be disabled initially because there is no DrinkName text.
The Button won’t become enabled until (a) the ViewModel tells the View that the CanAskForIt property has changed and (b) the property’s value becomes true. If you ran the application right now, the button would be disabled and would stay disabled no matter what we typed in the drink name TextBox. If you entered text and tested the CanAskForIt property in the debugger, it would return true. But the View doesn’t know that … and won’t know that … until the ViewModel notifies it.
Enable ViewModel change notification
1. Make MainPageViewModel inherit from System.ComponentModel.INotifyPropertyChanged and implement that interface as follows:
| C# | using System.ComponentModel; ... public class MainPageViewModel : INotifyPropertyChanged { // ... elided ... public event PropertyChangedEventHandler PropertyChanged; protected void NotifyOfPropertyChange(string propertyName) { var handlers = PropertyChanged; if (null == handlers) return; // no one is listening handlers(this, new PropertyChangedEventArgs(propertyName)); } } |
Now the View will refresh a property binding when we call NotifyOfPropertyChange with the name of the property to refresh. In this case, we want the View to update when the state of CanAskForIt changes.
CanAskForIt changes when the DrinkName changes. We need the setter of the DrinkName property to raise the PropertyChanged event for CanAskForIt.
2. Rewrite the DrinkName property as follows:
| C# | private string _drinkName; public string DrinkName { get { return _drinkName; } set { _drinkName = value; NotifyOfPropertyChange("CanAskForIt"); } } |
Build and run [F5]
The button starts disabled.
Type the name of a drink in the TextBox then tab out of the TextBox. The button is enabled. When you click it, the MessageBox appears.
An unpleasant experience
We’d really like to enable or disable the button as the user types in the TextBox. At the moment there are no visual cues that the button could be pressed and with no other enabled controls on the screen that are clickable, the user could think the application is frozen.
The problem is that the TextBox binding doesn’t update the ViewModel’s DrinkName property until the TextBox loses focus. In WPF you can set the UpdateSourceTrigger of the TextBox binding to "PropertyChanged" so that the DrinkName property updates as the user types.
Let’s add UpdateSourceTrigger option to the TextBox binding and set the option to update the ViewModel’s DrinkName property as the user types.
| XAML | <TextBox x:Name="DrinkName" Margin="0,8,0,8" Text="{Binding DrinkName, Mode=TwoWay, UpdateSourceTrigger=PropertyChanged}" /> |
Last call
We’re done for now. It’s time for a refreshing drink and a review of what we’ve done.
We’ve created a simple, single-View Silverlight application that follows the Model-View-ViewModel (MVVM) pattern without the aid of any framework.
Perhaps we should have stuck with our initial version that kept all logic in the View code-behind. It took work to get to MVVM and we have little to show for it so far. The author is willing to bet the benefits of MVVM will become apparent … but feels the anticipatory investment of effort should be lower. In the next lesson, we’ll see what Punch can do to make writing in MVVM style much easier.
Ask the Mixologist
Our first lesson is finished. Feel free to move on directly to the next one. This “Ask the Mixologist” section is an optional digression from the lesson’s main course to related points of interest.
What is a View?
A View presents information and accepts input from a human user. A View is typically manifested as a rectangular area of on-screen real estate containing visual controls (TextBlocks, TextBoxes, Buttons, etc.).
The boundaries of the view are up to you. It can be as small as a single control or fill the entire display. Views can contain other views ("view composition"). Views can appear in the main window ("the shell") or in a popup window.
What is a ViewModel?
Most Views display and update data. There can be a lot of code involved in retrieving the data, forwarding data values to the user controls, validating user input, responding to user gestures (e.g., button clicks and mouse-overs), and saving changed data.
You can put all of this logic into the View class’s code-behind. But most developers believe their code is easier to maintain when they move most of these mechanics to a separate helper class called the ViewModel.
Such separation allows the developer of the View to concentrate on the visual design and the immediate interactions between the View and the user without simultaneously addressing the non-visual dependencies such as where data come from or the business and application logic. Those concerns are handled separately by the developer of the ViewModel who can proceed without worrying about the artful design of an expressive and effective View. This separation is helpful even when the developer of the View and the developer of the ViewModel are the same person.
The division of responsibilities between the View and the ViewModel is central to the Model-View-ViewModel (MVVM) pattern favored by Silverlight and WPF developers.
What is the difference between MVVM and MVC?
If you are familiar with MVC (“Model-View-Controller”) than you already have a grasp of the essential motivation behind the MVVM (“Model-View-ViewModel”) pattern: the separation of the purely visual representation of the View from the non-visual state and behaviors that make the View "work".
The ViewModel in MVVM plays the same role as the Controller in MVC. It acts as the non-visual helper class that makes the View “work”. The differences between ViewModel and Controller revolve around how the helper class supports the View.
A Controller in MVC has a more direct awareness and involvement in the preparation and servicing of the View even when that awareness is somewhat abstracted through an interface.
Silverlight and WPF rely on a declarative data binding system that maps controls in the View to corresponding members of the ViewModel without either the View or the ViewModel having knowledge of the other.
The core principle - separating the presentation into a View and non-View helper – is what really matters. The choice between MVC and MVVM is usually based on the facilities available in the client technology you chose. Silverlight and WPF’s rich, bidirectional data binding incline toward the MVVM pattern.
Where is the Model in this MVVM app?
The Model of a typical business app is a coherent set of classes that hold application data and implement the business rules that govern those data. "DrinkOrder", "Product", and "Order" are names of classes you might expect in an order management system.
There is no such Model in this example. Stay with us; we’ll get to the Model a few lessons from now.
Why bother with the folders?
I had you create Views and ViewModels folders right from the start. At the moment you only have one class in each folder. Isn’t this over-engineering?
It certainly would be if we expected only one View and one ViewModel in our application. Of course MVVM and Punch itself would be over-engineering in a single screen application.
If you postpone this step, you won’t realize you have a problem until the project is cluttered with twenty or thirty View/ViewModel pairs. By then the logistics of moving files and repairing misaligned namespaces will be truly painful.
You aren’t speculating that you might have a lot of views someday. It’s a near-term certainty. In this case, an ounce of prevention really is worth a pound of cure. Do it now; thank me later.
Why is it a bad idea to call MessageBox in the ViewModel?
A comment in the AskForIt method warns us that we should not call MessageBox.Show in the ViewModel of a real application.
The problem isn’t that we are using a MessageBox in our UI – that could be a reasonable design choice. The problem is that we are referring to the MessageBox class in our ViewModel. That’s a bad idea for two reasons:
Principle:
A ViewModel should avoid dependence on specific UI controls. The View –not the ViewModel - determines what the user sees and how the user interacts with the application. In this case, the ViewModel dictates the user experience, preventing the UI designer from doing his/her job which is to find the best and most consistent way for users to see and respond to information.
Practical:
By baking the MessageBox class into the ViewModel we have made the ViewModel difficult to test. To test if calling the AskForIt method does the right thing, the test harness would have to spin up a MessageBox and our test code would have to find and inspect that MessageBox to determine that it presented the expected message. That’s too much work just to find out if our AskForIt method is saying One Daiquiri, coming right up! when the drink name is Daiquiri. When testing is hard, we don’t do it … with predictable adverse consequences.
A better approach is to define and call upon an interface of a message displaying component. An appropriate implementation of that interface would be provided to the ViewModel at test and runtime. We may take up an illustration of this alternative in a future lesson.
Could we have bound the button to an ICommand?
Silverlight and WPF abstract and unify command combinations such as AskForIt and CanAskForIt with a version of "Commanding”" based on the System.Windows.Input.ICommand interface.
If we chose this path we would:
- Add a generalized Command class to our solution that implements ICommand.
- Modify the MainPageViewModel to
- expose an AskForItCommand.
- extend the DrinkName property setter to RaiseCanExecuteChanged when the property changes.
- In MainPage, bind the button’s Command property to the ViewModel’s AskForItCommand.
- Delete the obsolete AskForIt_Click handler from the MainPage code-behind.
We’ve included an example of this approach in the 01-HappyHour sample that accompanies this lesson.
The benefit is that we’ve reduced the size of the code-behind by the click handler. Minimizing code in code behind is a priority for MVVM developers.
But is it worth the effort? We must write the ViewModel AskForIt and CanAskForIt members regardless. The button click handler, which is trivially easy to read and write, merely delegates to the ViewModel. The Command object is extra complexity and you can only use this kind of Command binding approach for buttons; we want commanding for other kinds of events too (e.g., selection in a ComboBox). Why bother?