
General Actions:


DevForce Resource Center » Punch » Reference apps and tutorials » The Happy Hour Tutorial » Entity Views
Last modified on January 26, 2015 14:48
Contents
We learn to use a View class instead of an DataTemplate to display entities in a ListBox. We update Punch conventions to treat entity classes as ViewModels.
We saw in the previous lesson how to use a DataTemplate to display DrinkOrder entities in a ListBox. We were still able to use conventional View/ViewModel binding thanks to the Bind.ModelWithoutContext attached property.
It wasn’t pretty.
- We had to add that attached property to the DrinkOrderDataTemplate.
- We had to re-implement the TextBlock implicit style.
- We can’t visualize the DrinkOrderDataTemplate in the Designer.
- We can’t add a code-behind to a DataTemplate if we discover we need View behavior that is difficult to express in XAML.
We’ll try a different approach in this lesson. We’ll redefine the View of the DrinkOrder as a UserControl and marry that View to the DrinkOrder entity class as if that class were a ViewModel. We’ll change the stock conventions to recognize Views associated with entity classes in the Model.
Define a View for the DrinkOrder entity
1. Select the Views folder.
2. Add | New Item | Silverlight User Control | "DrinkOrderEntityView"
3. Delete the DrinkOrderEntityView.xaml.cs code-behind as we won’t be using it.
4. Replace the empty <Grid> … </Grid> with the following XAML plucked from the DrinkOrderDataTemplate that we wrote in the previous lesson:
| XAML | <Grid> <Grid.RowDefinitions> <RowDefinition /> <RowDefinition /> <RowDefinition /> </Grid.RowDefinitions> <Grid.ColumnDefinitions> <ColumnDefinition /> <!-- column for labels --> <ColumnDefinition /> <!-- column for values --> </Grid.ColumnDefinitions> <TextBlock Text="Id:" Grid.Row="0" Grid.Column="0" Padding="2"/> <TextBlock Text="Drink Name:" Grid.Row="1" Grid.Column="0" Padding="2"/> <TextBlock Text="Created:" Grid.Row="2" Grid.Column="0" Padding="2" /> <TextBlock x:Name="Id" Grid.Row="0" Grid.Column="1" Padding="2"/> <TextBlock x:Name="DrinkName" Grid.Row="1" Grid.Column="1" Padding="2"/> <TextBlock x:Name="Created" Grid.Row="2" Grid.Column="1" Padding="2" Text="{Binding Created, StringFormat=\{0:F\}}" /> </Grid> |
It’s much simpler now. We can see this View displayed appropriately on the Visual Studio Design canvas. We don’t have to re-implement the TextBlock implicit style because the ambient implicit style flows through to the TextBlocks in this template. We don’t need the attached property and we don’t need the Caliburn namespace.
5. Delete DrinkOrderDataTemplate.xaml from the View folder; we won’t need it again.
Revise the MainPage.xaml
1. Delete the <UserControl.Resources> from near the top of the file; the item template is gone and we don’t need to define any other resources at this time.
2. Delete mention of the ItemTemplate from the ListBox which now reads:
| XAML | <ListBox x:Name="DrinkOrders" Grid.Row="4" /> |
First failed run
1. Build and run [F5].
2. Enter the letter 'x' into the TextBox. The button lights up.
3. Click the button. The TextBox clears and a DrinkOrder appears in the ListBox below the button … sort of.
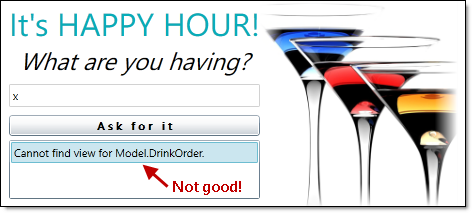
What went wrong?
I could tell you but it’s more important to learn how to diagnose a problem and how the system works.
First, let’s confirm that the application is populating the ListBox with DrinkOrder entities.
1. Put a breakpoint on the SelectedDrinkOrder setter in the MainPageViewModel.
2. Enter another drink and press the button. Satisfy yourself that the SelectedItem is indeed a DrinkOrder entity. ViewModel plumbing is working fine.
Now review the log displayed in the Visual Studio Output window:
| Log | ... ViewLocator WARN: View not found. Searched: . ... ViewModelBinder INFO: Binding System.Windows.Controls.TextBlock and Model.DrinkOrder. ... Action INFO: Setting DC of System.Windows.Controls.TextBlock to Model.DrinkOrder. |
The warning tells us that Punch can’t find a View that it’s looking for after searching … well it doesn’t say where or what it searched for but experienced hands know that it searched the executing assembly for a View to go with the DrinkOrder entity.
Apparently Punch thinks our DrinkOrder entity is a ViewModel! Why not? Any object can be a ViewModel.
The problem is that Punch lacks a convention that matches our DrinkOrderEntityView to a class in the Model namespace called "DrinkOrder". Having failed to find a view, it substitutes the standard "Missing View" view which consists of a TextBlock prepared with the text "Cannot find view for Model.DrinkOrder."
Finally, it binds the DrinkOrder to the DataContext of this artificial "Missing View" … which is pointless here but would make perfect sense if the "Missing View" were a real view.
Create our own naming convention
Punch can’t anticipate every convention we dream up. Fortunately, the naming conventions are ours to amend. Customizing the naming conventions is an advanced feature but it’s not hard. We’d dearly like to see this work and drive home the point that any class can be a ViewModel. So let’s tweak the conventions … as if we knew what we were doing.
1. Open the AppBootstrapper class file.
2. Override the base Configure method.
3. Add a NameTransformer rule.
| C# | protected override void Configure() { base.Configure(); Caliburn.Micro.ViewLocator.NameTransformer // Map "Model" classes to views in "HappyHour.Views" .AddRule(@"^Model\.(\w*)(?<basename>)", "HappyHour.Views.${1}Entity${basename}View"); } |
Take a deep breath; naming rules are defined with “regular expressions” which are pretty hairy for all of us. We describe how this one works in detail in commentary below.
The short of it is that we’ve added a rule to map entity class names in the Model namespace to view class names in the HappyHour.Views namespace. There is a twist: to emphasize that this is no ordinary view, we want the particle “Entity” to appear between the basename and the suffix, that is, between “DrinkOrder” and “View”.
Thus, an entity class name such as “Model.DrinkOrder” will be transformed to a view class, “HappyHour.Views.DrinkOrderEntityView”.
We just added that view class to the project. At runtime, each time we click the button, Punch adds a new DrinkOrder instance to the collection, then pairs the DrinkOrder to a new DrinkOrderEntityView for display in the ListBox.
Build and run [F5]
Watch the Output window as you add each new DrinkOrder. You’ll see a sequence such as:
| Log | [34] ActionMessage INFO: Invoking Action: AddDrinkOrder. [35] ViewModelBinder INFO: Binding HappyHour.Views.DrinkOrderEntityView and Model.DrinkOrder. [36] Action INFO: Setting DC of HappyHour.Views.DrinkOrderEntityView to Model.DrinkOrder. ... Elided for brevity ... [42] ViewModelBinder INFO: Binding Convention Applied: Element Id. [43] ViewModelBinder INFO: Binding Convention Applied: Element DrinkName. [44] ViewModelBinder INFO: Binding Convention Not Applied: Element Created has existing binding. |
#34 represents the button click as before. But this time Message #35 confirms that Punch is "Binding HappyHour.Views.DrinkOrderEntityView and Model.DrinkOrder" as we intend.
Messages #42 and #43 tell us that the "Id" and "DrinkName" UI controls were data bound conventionally.
Message #44 reminds us that the UI element, "Created", has an existing binding defined in the XAML (see above); that binding is preserved and the convention ignored.
Last Call
The DataTemplate resource is the traditional way to display ListBox items … and we have nothing against that approach. You can use Punch’s conventional binding with that template just as you would with a full-blown View class. But DataTemplates can be squirrelly in ways we discussed. When the item display becomes more complex, it may be better to render the entity with a View class rather than a data template.
You could write a ViewModel dedicated to supporting that View … but such a ViewModel would do no more than receive an entity when constructed and present it to the View for display. That strikes us as wasted effort, a case of MVVM purity getting in the way of productivity.
Instead, we modified the View/ViewModel binding conventions so that an entity can act as its own ViewModel. Just like that, the conventions “just work.”
Ask the Mixologist
This lesson is finished. Feel free to move on directly to the next one. This "Ask the Mixologist" section is an optional digression from the lesson’s main course to related points of interest.
How Views are displayed in the ListBox
The log in the Visual Studio Output window is instructive.
| Log | [28] ConventionManager INFO: ItemTemplate applied to DrinkOrders. |
It tells us that an "ItemTemplate" was applied to the "DrinkOrders" ListBox.
What "ItemTemplate"? We haven’t defined an “ItemTemplate” so Caliburn substitutes a default ItemTemplate consisting of a ContentControl.
| XAML | <DataTemplate xmlns="http://schemas.microsoft.com/winfx/2006/xaml/presentation" xmlns:cal="clr-namespace:Caliburn.Micro;assembly=Caliburn.Micro"> <ContentControl cal:View.Model="{Binding}" VerticalContentAlignment="Stretch" HorizontalContentAlignment="Stretch" /> </DataTemplate> |
That ContentControl fills the available space with the View for the ListBox item which acts as the ViewModel. The "cal:View.Model" attached property finds and constructs the proper View using the same ViewLocator mechanism that associated the MainPage with the MainPageViewModel.
That’s pretty clever.
We put ViewModels in the ListBox.ItemsSource and let Punch compose the corresponding Views for display.
What about multiple views for a DrinkOrder?
A ViewModel usually has only one View. When you see the ViewModel class name, you pretty much know the name of the one View that goes with it.
But you’ll find many examples of a ViewModel with multiple Views in the wild. Windows Explorer, for example, offers multiple views of the items in a directory:
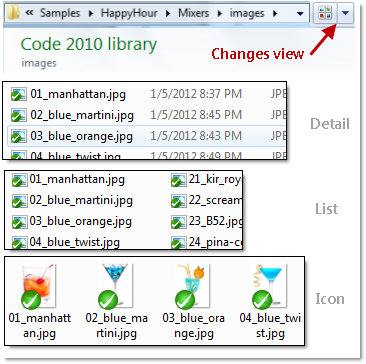
Imagine you want to display a DrinkOrder in two different ways in two different contexts:

We already have the DrinkOrderEntityView on the left; let’s create a DrinkOrderEntity.MiniView to display the view on the right.
1. Select the Views folder.
2. Add | New Item | Silverlight User Control | "DrinkOrderEntity.MiniView.xaml"
Take note of the period (.) between "DrinkOrderEntity" and "MiniView". This view name follows the convention for alternative views:
Strip 'View' from the end of the normal view name, add a period (.), and add the suffix that distinguishes the alternate view.
We started with "HappyHour.Views.DrinkOrderEntityView", stripped off "View", added a period (.), and added "MiniView" to get "HappyHour.Views.DrinkOrderEntity.MiniView".
The view itself is unremarkable, a single row grid with four columns as shown here.
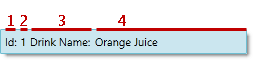
The corresponding XAML is:
| XAML | <UserControl x:Class="HappyHour.Views.DrinkOrderEntity.MiniView" xmlns="http://schemas.microsoft.com/winfx/2006/xaml/presentation" xmlns:x="http://schemas.microsoft.com/winfx/2006/xaml" xmlns:d="http://schemas.microsoft.com/expression/blend/2008" xmlns:mc="http://schemas.openxmlformats.org/markup-compatibility/2006" mc:Ignorable="d" d:DesignHeight="300" d:DesignWidth="400"> <Grid> <Grid.ColumnDefinitions> <ColumnDefinition /> <ColumnDefinition /> <ColumnDefinition /> <ColumnDefinition /> </Grid.ColumnDefinitions> <TextBlock Text="Id:" Grid.Column="0" Padding="2"/> <TextBlock x:Name="Id" Grid.Column="1" Padding="2"/> <TextBlock Text="Drink Name:" Grid.Column="2" Padding="2"/> <TextBlock x:Name="DrinkName" Grid.Column="3" Padding="2"/> </Grid> </UserControl> |
We’re using the same conventional binding as in DrinkOrderEntityView except we’re no longer displaying the Created property.
3. Delete the DrinkOrderEntity.MiniView.xaml.cs code-behind which isn’t needed.
4. Open MainPage.xaml.
Next we’ll tell the framework to use our newly-created MiniView.
Recall that the framework binds the ListBox.ItemTemplate to a default ItemTemplate consisting of a ContentControl that hosts a View. We’ll substitute our own ItemTemplate.
5. Add the Caliburn namespace so we can write some Caliburn attached properties.
| XAML | <UserControl ... xmlns:cal="http://www.caliburnproject.org" ... /> |
6. Add the following XAML just below the <UserControl> element
| XAML | <UserControl.Resources> <DataTemplate x:Key="DrinkOrderItemTemplate" > <ContentControl cal:View.Context="MiniView" cal:View.Model="{Binding}" HorizontalAlignment="Stretch" VerticalAlignment="Stretch"/> </DataTemplate> </UserControl.Resources> |
This custom ItemTemplate is now a local resource of MainPage. It contains a ContentControl to hold an injected View just as the default template does.
As in the default template, the cal:View.Model attached property binds the ContentControl.DataContext to the ViewModel (the DrinkOrder in this example). That’s what previously triggered discovery and construction of the DrinkOrderEntityView.
But our DrinkOrderItemTemplate differs in one critical detail: the cal:View.Context attached property that specifies the alternate view’s suffix name, "MiniView". Thanks to the View.Context, the application will discover and construct a DrinkOrderEntity.MiniView instead of a DrinkOrderEntityView.
7. Change the ListBox definition to use the DrinkOrderItemTemplate as its ItemTemplate.
| XAML | <ListBox x:Name="DrinkOrders" ItemTemplate="{StaticResource DrinkOrderItemTemplate}" Grid.Row="4" /> |
8. Build and run [F5].
Try a few drink order names to confirm that you’re seeing the one-line MiniView of DrinkOrders.
Explain the NameTransformer rule
We added our own ViewModel-to-View name transformation rule in the Configure method of the AppBootstrapper. The rule involved a pretty heavy Regular Expression. Here I try to explain what that expression does.
Let me refresh your memory about the rule:
| C# | Caliburn.Micro.ViewLocator.NameTransformer // Map "Model" classes to views in "HappyHour.Views" .AddRule(@"^Model\.(\w*)(?<basename>)", "HappyHour.Views.${1}Entity${basename}View"); |
The NameTransformer consists of a collection of rules that transform the name of a ViewModel class into the name of a View class. We’re adding a new rule that applies a search pattern (the first string) to the name of the ViewModel class. If the pattern matches, the NameTransformer applies the replacement (the second string) to produce candidate View names.
In our rule, the ViewModel will be an entity class name in the "Model" namespace. The search pattern – “^Model\.(\w*)(?<basename>)” – translates into English as:
Match any class name that begins with Model. ("Model dot") followed by any number of word characters followed by nothing.
The parentheses in the pattern define a "capture group" that will contain the name of the entity class within the Model namespace.
The “(?<basename>)” is a placeholder capture group; it won’t capture a thing but it needs to be there to satisfy the NameTransformer.
The replacement pattern – “HappyHour.Views.${1}Entity${basename}View” – means:
If you find a match, build a View class name consisting of "HappyHour.Views." followed by the first capture group followed by "EntityView". The "${basename}" is always empty so ignore it.
The first capture group is identified by the ${1} token and refers to the entity class name discovered during the match. Here’s how it works for us:
- "Model.DrinkOrder" matches the pattern because it begins with "Model."
- "DrinkOrder" is the matched text in group ${1}
- The replacement concatenates "HappyHour.Views." + "DrinkOrder" + "EntityView"
Thus "Model.DrinkOrder" becomes "HappyHour.Views.DrinkOrderEntityView" as we intend.